In Vivo Photopolymerization for Bioelectronics: A New Paradigm for Minimally Invasive Neural Interfaces
This article explores the transformative potential of in vivo photopolymerization, a groundbreaking technique for creating soft, conductive bioelectronic interfaces directly within living tissue.
In Vivo Photopolymerization for Bioelectronics: A New Paradigm for Minimally Invasive Neural Interfaces
Abstract
This article explores the transformative potential of in vivo photopolymerization, a groundbreaking technique for creating soft, conductive bioelectronic interfaces directly within living tissue. Aimed at researchers, scientists, and drug development professionals, we cover the foundational principles of this technology, from novel photoactive monomers and light sources to the formation of biocompatible conductive hydrogels. The scope extends to detailed methodological approaches for creating complex 3D circuits in vivo, strategies for optimizing polymerization kinetics and overcoming oxygen inhibition, and a comparative analysis with traditional bioelectronics. By synthesizing the latest research, this review highlights how this minimally invasive approach can mitigate inflammatory responses and enable new therapeutic strategies for neurological diseases, marking a significant advancement in personalized bioelectronic medicine.
The Principles and Promise of In-Situ Bioelectronic Fabrication
Defining In Vivo Photopolymerization for Biomedical Applications
In vivo photopolymerization represents a transformative methodology in bioelectronics, enabling the direct formation of conductive polymer structures within living organisms. This process involves the spatial control of polymerization reactions using light, facilitated by photolithography masks, to create sophisticated electrode patterns and layered circuits in vivo [1]. Unlike pre-formed implanted electrodes, which often cause inflammation and scarring, in vivo photopolymerization allows for the creation of biocompatible, intricately patterned conductive structures that conform to biological tissues. This application note details the protocols, quantitative parameters, and material requirements for implementing this technology in biomedical research, particularly for the development of advanced bioelectronic therapeutics.
The core advantage of this technique lies in its combination of spatial control and biocompatibility. Traditional implanted electrodes, while offering good geometric control, are rigid and provoke a foreign body response. Conversely, earlier in situ methods, such as enzymatically catalyzed conductive polymer formation, suffer from slow kinetics governed by diffusion, with curing times spanning hours to days [1]. In vivo photopolymerization overcomes these limitations by using light to rapidly define conductive patterns with short curing times of 5-30 minutes, opening the possibility for creating complex 3D layer-on-layer circuits directly within biological environments [1].
The following tables consolidate key quantitative data essential for the planning and execution of in vivo photopolymerization experiments. These parameters directly influence the properties of the resulting conductive polymers and their compatibility with biological systems.
Table 1: Key Photopolymerization Process Parameters and Outcomes
| Parameter | Value / Range | Significance / Outcome |
|---|---|---|
| Curing Time | 5 - 30 minutes | Significantly faster than enzymatic methods (hours/days); enables rapid device formation in vivo [1]. |
| Light Wavelength | Green and Red Light | Adapted for in vivo conditions to ensure tissue compatibility and sufficient penetration [1]. |
| Spatial Control | Defined by Photolithography Masks | Enables the creation of specific, layered patterns and complex 3D circuits, unlike basic electrode structures from other in situ methods [1]. |
| Conductive Polymer | Poly(3,4-ethylenedioxythiophene)butoxy-1-sulfonate (PEDOT-S) derivative A5 | Results in conductive structures with desired electronic properties for bioelectronics [1]. |
| Key Monomer | 3Es (EDOT-trimers) | Novel photoactive monomers used alone or in mixture to cure the PEDOT-S derivative [1]. |
Table 2: Material Properties and Characterization Data
| Property / Condition | Measurement | Experimental Context |
|---|---|---|
| Shrinkage Strain | ~5% (after solidification) | Measured in acrylate resin model systems; strain variation became milder as the reaction proceeded [2]. |
| Young's Modulus | Increased nearly linearly with conversion degree (φ) | Characterized in thin films (0.05 mm) under constant light intensity (5 mW cm⁻²); relationship is linear before glass transition is passed [2]. |
| Bending Curvature | Decreased with illumination time and incident light intensity | Observed in polymer strips cured via FPP; curvature is dependent on the incident energy dose (irradiation time × intensity) [2]. |
| Light Intensity (FPP) | 5 mW cm⁻², 9.5 mW cm⁻² | Used in frontal photopolymerization experiments to study curing depth and bending behavior [2]. |
| UV Laser Power | 1.5 mW cm⁻² | Used for photopolymerization of liquid-crystalline monomers in visualization studies [3]. |
Experimental Protocols
Protocol: In Vivo Photopolymerization of Conductive Patterns
This protocol describes the formation of detailed conducting polymer patterns within a living organism using photopolymerization, adapted from recent pioneering research [1].
I. Materials Preparation
- Monomer Solution: Prepare a solution of the 3Es (EDOT-trimers) photoactive monomers. This solution can be used alone or in a mixture formulated to cure the PEDOT-S derivative A5.
- Light Source: Set up a light source capable of emitting in the green and red spectra (e.g., lasers or LEDs), adapted for safe use in vivo.
- Photolithography Mask: Design and fabricate a mask with the desired electrode or circuit pattern. This mask will define the geometry of the polymerized structure.
II. Surgical Preparation and Administration
- Anesthetize the animal subject according to approved institutional animal care protocols.
- Perform a sterile surgical procedure to expose the target tissue or organ where the bioelectronic device is to be formed.
- Inject or apply the prepared monomer solution directly to the target site in vivo.
III. Photopolymerization Process
- Position the photolithography mask between the light source and the target area. The mask can be placed externally for superficial targets or, where feasible, miniaturized and introduced internally.
- Irradiate the target area with light for a duration of 5 to 30 minutes. The exact time depends on the light intensity, monomer formulation, and desired degree of polymerization.
- During irradiation, the photopolymerization reaction proceeds selectively in the illuminated areas defined by the mask, forming a solid, conductive polymer structure.
IV. Post-Polymerization and Analysis
- After irradiation, carefully close the surgical site if applicable.
- Monitor the subject and allow for recovery.
- The resulting conductive structure can be characterized ex vivo at the endpoint for its electrical properties, integration with tissue, and lack of adverse immune responses.
Protocol: Frontal Photopolymerization (FPP) for Origami Structures
This protocol utilizes FPP to create three-dimensional origami structures based on photopolymerization-induced volume shrinkage, a mechanism relevant to forming compliant bioelectronic interfaces [2].
I. Resin and Substrate Preparation
- Resin Formulation: Prepare a photocurable polymer resin (e.g., acrylate-based). To control light penetration, add a photoabsorber to the resin to create an attenuated light field.
- Substrate Treatment: Use a Poly(dimethylsiloxane) (PDMS) substrate placed in a petri dish. PDMS provides an anti-stiction surface, ensuring the cured part can be easily removed, which is crucial for the bending behavior.
II. Photopolymerization and Shape Formation
- Fill the PDMS-lined petri dish with the liquid resin.
- Project light upward from the bottom of the dish through the transparent substrate. The light intensity (e.g., 5 mW cm⁻²) and irradiation time are critical control parameters.
- Due to the photoabsorber, a light intensity gradient is created, leading to non-uniform curing and volume shrinkage through the thickness of the resin. The layer directly exposed to light cures faster than subsequent layers.
- This sequential shrinkage creates a non-uniform stress field: the early-cured layer (near the substrate) develops compressive stress, while the newly-cured layer develops tensile stress.
III. Release and 3D Structure Formation
- Remove the solidified film from the PDMS substrate. Upon release, the internal stress gradient is relieved, causing the sample to bend toward the newly cured side.
- The bending curvature can be precisely controlled by adjusting the irradiation dose (time × intensity). Higher doses generally result in thicker, stiffer films with lower curvature.
- By spatially controlling the curing conditions (e.g., using grayscale patterns), complex 3D origami structures can be created spontaneously upon release from the substrate.
The Scientist's Toolkit: Research Reagent Solutions
Table 3: Essential Materials for In Vivo Photopolymerization Experiments
| Reagent / Material | Function and Application in Research |
|---|---|
| 3Es (EDOT-trimers) | Novel photoactive monomers that, upon light exposure, form the backbone of the conductive polymer network, either alone or in a mixture with PEDOT-S [1]. |
| PEDOT-S Derivative A5 | A specific conductive polymer derivative that is cured during the photopolymerization process, resulting in structures with enhanced electronic properties for biointerfacing [1]. |
| Photoabsorbers | Added to the resin to create an attenuated light field, which is essential for generating the curing gradient in frontal photopolymerization that drives bending and 3D structure formation [2]. |
| PDMS (Polydimethylsiloxane) Substrate | Used as a non-adhesive substrate during FPP. Its anti-stiction properties, due to residual oxygen inhibition and pendent oligomers, allow the cured polymer to detach and bend freely [2]. |
| Quantum Dots (e.g., CdSe/ZnS) | Used as fluorescent tracers at minute concentrations to visualize mass flow and diffusion processes during photopolymerization via single-particle fluorescence imaging [3]. |
| Photolithography Masks | Critical for defining the spatial pattern of the polymerized structure. The mask blocks light in specific areas, allowing for the creation of detailed electrodes and circuits [1]. |
Workflow and Signaling Visualizations
In Vivo Photopolymerization Workflow
Mass Flow Induced Alignment
Photopolymerization, a process where light transforms liquid monomers into solid polymers, is revolutionizing the fabrication of bioelectronic devices [4]. This technique provides unparalleled spatial and temporal control, enabling the creation of sophisticated, tissue-conformal electronics directly within biological environments [5]. The core components of this technology—photoactive monomers, photoinitiators, and light sources—determine the success of in vivo applications, influencing everything from biocompatibility and electrical conductivity to the resolution of the final construct. Within the context of bioelectronics, these components must be carefully engineered to function under physiological conditions, minimize immune response, and integrate seamlessly with soft, dynamic tissues [4]. The shift toward in vivo photopolymerization represents a paradigm change from traditional pre-fabricated, rigid implants to soft, compliant devices formed directly at the site of implantation.
Core Components and Material Selection
Photoactive Monomers
Photoactive monomers are the fundamental building blocks that form the polymer network upon light exposure. For in vivo bioelectronics, these monomers must meet stringent requirements for biocompatibility, mechanical matching with tissues, and often, biodegradability.
Acrylic Monomers are widely used due to their high reactivity. In the context of bioelectronics, formulations often include:
- Acrylamide (AAm): Serves as a primary monomer for forming hydrogel networks that can host conductive materials [6].
- 2-Hydroxyethyl Acrylate (HEA): Provides hydrophilic character and improves biocompatibility [6].
- Poly(Ethylene Glycol) Diacrylate (PEGDA): Acts as a crosslinker to control hydrogel mesh size and mechanical properties [6].
- 2-Hydroxyethyl Methacrylate (HEMA): A common reactive diluent in urethane acrylate-based systems [7].
Biodegradable Elastomers are engineered for transient electronics. A prominent example is acrylated Poly(L-lactide-co-ε-caprolactone) (UV-PLCL), which combines the elasticity of caprolactone with the biodegradability of lactide. Under light exposure, the acrylic end-groups facilitate cross-linking to form a soft, degradable network ideal for temporary implants [5].
Photoinitiators (PIS) and Photosensitizers (PS)
Photoinitiators are compounds that absorb light and generate active species (free radicals) to start the polymerization reaction. Their selection is critical for deep tissue curing and biocompatibility.
Conjugated Polymer Nanoparticles, such as Poly(3-hexylthiophene) Semiconducting Polymer Nanoparticles (P3HT SPNs), represent a major advancement [6]. They function with a dual role:
- As Visible-Light Photoinitiators: P3HT SPNs absorb visible light (e.g., λ = 467 nm) to generate free radicals, enabling the polymerization of acrylic hydrogels without requiring toxic co-initiators [6].
- As Photosensitizers: Once embedded within the polymerized hydrogel, P3HT SPNs retain their photoelectrochemical properties. Upon subsequent light exposure, they generate reactive oxygen species (ROS), such as 12-15 μM H₂O₂, enabling applications in photodynamic therapy [6].
Traditional Photoinitiating Systems are often used in bimolecular configurations:
- Dye Sensitizers: Camphorquinone (CQ) and Eosin Y (EY) absorb specific light wavelengths.
- Co-initiators: These include iodonium salts (e.g., diphenyliodonium hexafluorophosphate), thiols (e.g., trimethylolpropane tris(3-mercaptopropionate)), and amines (e.g., triethylamine). The co-initiator reacts with the excited dye to produce the initiating radicals [7] [5].
- Type I Photoinitiators: Such as ethyl (2,4,6-trimethylbenzoyl) phenylphosphinate (TPO-L) and 2,4,6-Trimethylbenzoyldiphenylphosphine oxide (TPO), undergo cleavage upon light absorption to directly generate free radicals [7] [5].
Table 1: Key Photoinitiator Systems for Biomedical Applications
| Photoinitiator / System | Activation Wavelength | Co-initiator Required? | Key Characteristics | Demonstrated Application |
|---|---|---|---|---|
| P3HT SPNs [6] | Visible light (λ > 405 nm, e.g., 467 nm) | No | Dual role as PI and PS; High biocompatibility | In vitro hydrogel PDT against cancer cells |
| Camphorquinone (CQ) System [7] | 365 nm & 405 nm (Dual LED) | Yes (e.g., Iodonium salts, amines) | Common in dental and cosmetic applications | Highly pigmented UV/LED-curable nail gels |
| Eosin Y (EY) System [7] | 365 nm & 405 nm (Dual LED) | Yes (e.g., Iodonium salts, thiols) | Highly pigmented UV/LED-curable nail gels | |
| TPO / TPO-L [7] [5] | 365 nm | No (Type I) | Efficient radical generation via cleavage | Pigmented coatings; Biodegradable elastomers |
The choice of light source dictates the penetration depth, curing speed, and viability of surrounding tissues.
- Wavelength: Blue (467 nm), green, and red light are used for in vivo processes due to their superior tissue penetration compared to UV light [4]. UV (365 nm) and violet (405 nm) are common in dual-LED systems for surface curing and in vitro applications [7].
- Source Type: LED lamps are prevalent due to their narrow emission spectra, low heat output, and portability. Systems can be configured with single or multiple wavelengths (e.g., dual 365/405 nm LEDs) to activate different initiators simultaneously [7].
- Intensity and Dose: Controlled intensity (e.g., 0.5 to 5.0 W/cm²) and exposure time (seconds to minutes) are critical parameters that directly influence the polymerization rate, final conversion, and mechanical properties of the material [8].
Application Notes: In Vivo and In Vitro Protocols
Protocol 1: In Vivo Formation of Conductive Bioelectrodes
This protocol details the direct formation of soft, conductive hydrogels within living tissue for neural interfacing, based on the work by researchers at Lund University [4].
Workflow Overview:
Materials:
- Light-sensitive ink: A solution of light-sensitive monomers (e.g., acetylene-functionalized conductive precursors) and a photoinitiator in a biocompatible buffer.
- Light source: LED lamp with adjustable wavelength (blue, green, or red) and intensity.
- Delivery system: Sterile syringe with a fine-gauge needle for minimally invasive injection.
- Animal model (e.g., zebrafish, chicken embryo, or mammalian model).
Procedure:
- Ink Preparation: Formulate the light-sensitive ink under sterile conditions. The viscosity should be suitable for injection.
- Ink Injection: Using a surgical procedure, carefully inject a small volume (scale-dependent on the target organism) of the ink into the target tissue, such as the brain or heart.
- Light Exposure: Within minutes of injection, expose the injection site to the selected light wavelength. For deep tissues, longer wavelengths (e.g., red) are preferred.
- Polymerization: Maintain light exposure for 5 to 30 minutes. The rapid reaction forms a soft, conductive hydrogel (with conductivity up to 10 S/m) that integrates with the host's cells and extracellular matrix.
- Validation: The resulting bioelectrode can be used immediately for applications such as regulating neural electrical signals. The device degrades naturally after use, requiring no surgical removal.
Protocol 2: Fabrication of P3HT-Based Hydrogels for Photodynamic Therapy
This protocol describes using P3HT SPNs as a dual-purpose visible-light photoinitiator and photosensitizer to create functional hydrogels for cancer therapy [6].
Workflow Overview:
Materials:
- Monomer solution: Aqueous solution of acrylic monomers (e.g., Acrylamide (AAm), 2-Hydroxyethyl Acrylate (HEA), and crosslinker Poly(Ethylene Glycol) Diacrylate (PEGDA)).
- P3HT SPNs suspension: Semiconducting polymer nanoparticles in water at a known concentration.
- Light source: Lamp emitting visible light at 467 nm.
- Photo-rheometer: For monitoring the gelation process in real-time.
- Cell culture materials: GL261 cancer cells or S. aureus bacteria for efficacy testing.
Procedure:
- Solution Preparation: Mix the monomer solution. For a PEGDA hydrogel, add the P3HT SPNs suspension to achieve a final concentration between 5 and 105 mg/mL. Higher concentrations (e.g., 80 mg/mL) lead to faster gelation.
- Gelation Monitoring: Transfer the solution to a photo-rheometer. Expose to 467 nm light and monitor the shear storage (G') and loss (G") moduli. The gelation point is identified when G' equals G". At 80 mg/mL P3HT SPNs, this typically occurs in ~45 minutes [6].
- Hydrogel Formation: Continue illumination until a solid hydrogel is formed. The resulting P3HT-loaded hydrogel is dark-colored and consistent.
- Photodynamic Therapy Application: Place the hydrogel in contact with target cells (e.g., GL261 glioma cells) under physiological conditions. For therapy, illuminate the hydrogel a second time with 467 nm light. This stimulates the embedded P3HT SPNs to generate ROS, leading to a ~50% reduction in cancer cell viability and ~99% death of S. aureus bacteria [6].
Protocol 3: Monolithic 3D Fabrication of Soft, Transient Electronics
This protocol outlines a layer-by-layer method for creating sophisticated, biodegradable electronic devices using solution-casting and photopatterning [5].
Materials:
- Substrate/Insulator: UV-PLCL resin with TPO (photoinitiator) and TTMP (crosslinking enhancer).
- Semiconductor: PLCL polymer matrix with P3HT nanofibrils and a diazirine crosslinker.
- Conductor: PEDOT:PSS solution with 2,4-hexadiyne-1,6-diol (HDD) and Zonyl FS-300 (surfactant).
- Fabrication setup: Spin coater, 365 nm and 254 nm UV light sources, and developing baths.
Procedure:
- Substrate Patterning: Spin-coat the UV-PLCL resin onto a carrier. Expose through a photomask to 365 nm UV light to crosslink and define the substrate pattern. Develop to remove unexposed resin.
- Semiconductor Deposition: Spin-coat the P3HT/PLCL semiconducting solution onto the substrate. Expose to 365 nm UV light without a mask to crosslink the entire layer via the diazirine crosslinker, forming a robust semiconducting film.
- Conductor Patterning: Spin-coat the PEDOT:PSS/HDD conducting solution. Expose through a photomask to 254 nm UV light to initiate the topochemical polymerization of HDD, which crosslinks and renders the exposed pattern insoluble. Develop with deionized water to remove unexposed areas.
- Post-processing: Enhance the conductivity of the PEDOT:PSS traces by secondary doping in methanol or 40% H₂SO₄.
- Application: This process can be repeated to build multilayer structures, resulting in integrated devices such as transistor arrays, sensors, and electrodes on an ultrathin (~3 μm), soft, and biodegradable platform.
Table 2: Quantitative Data from Photopolymerization Research
| Experiment / System | Key Parameter Measured | Result / Value | Experimental Conditions |
|---|---|---|---|
| P3HT SPN Gelation [6] | Gelation Time | ~45 min (80 mg/mL SPNs) ~65 min (105 mg/mL SPNs) ~80 min (5 mg/mL SPNs) | Monomers: AAm, HEA, PEGDA Light: λ = 467 nm |
| P3HT SPN Photocurrent [6] | Photocurrent Density | ~0.2 to ~1.1 μA cm⁻² | Embedded in hydrogel; Light: λ = 467 nm |
| P3HT SPN ROS Generation [6] | H₂O₂ Production | 12 - 15 μM | Upon illumination (λ = 467 nm) |
| Scaffold Fabrication (PCLTA) [8] | Light Intensity | 0.5 - 5.0 W/cm² | Polymer: PCLTA, Photoinitiator: Irgacure 2959 |
| Scaffold Fabrication (PCLTA) [8] | Exposure Time | 125 - 350 s | Varies with light intensity |
| Conductor Patterning (PEDOT:PSS) [5] | Optimal HDD Concentration | ~10% (w/w) | For effective photopatterning |
The Scientist's Toolkit: Research Reagent Solutions
Table 3: Essential Materials for In Vivo Photopolymerization Research
| Item / Reagent | Function / Role | Example & Notes |
|---|---|---|
| P3HT SPNs [6] | Visible-light Photoinitiator & Photosensitizer | Enables hydrogel formation and ROS generation without co-initiators. |
| UV-PLCL [5] | Biodegradable Substrate/Insulator | Acrylated Poly(L-lactide-co-ε-caprolactone); forms soft, elastic, and degradable films. |
| PEDOT:PSS with HDD [5] | Photopatternable Conductor | HDD crosslinks under 254 nm light, allowing for high-resolution aqueous patterning. |
| Diazirine Crosslinker [5] | Semiconductor Crosslinker | Forms stretchable semiconducting network with P3HT/PLCL upon 365 nm exposure. |
| TPO / TPO-L [7] [5] | Type I Photoinitiator | Efficient for UV curing (365 nm) in thick or pigmented systems and elastomers. |
| Iodonium Salts [7] | Co-initiator | Works with dye sensitizers (CQ, Eosin Y) in bimolecular photoinitiating systems. |
| Thiol Additives (e.g., TTMP) [5] | Crosslinking Enhancer | Mitigates oxygen inhibition, enabling efficient polymerization in ambient conditions. |
| Dual-Wavelength LED Lamp [7] | Light Source | Simultaneous 365 nm & 405 nm output for activating multiple photoinitiators. |
The integration of bioelectronic devices with biological tissues presents a significant challenge in modern therapeutic development. Conventional implanted electronics, typically composed of rigid, substrate-bound materials like silicon and metals, often provoke adverse biological responses—including inflammation, fibrosis, and scar tissue formation—that compromise device functionality and long-term stability [9] [1]. These issues primarily stem from a fundamental mechanical mismatch between the rigid, planar electronics and the dynamic, soft nature of biological tissues. Consequently, there is a pressing need for innovative approaches that enhance both biocompatibility and mechanical congruence to enable seamless biointegration.
In vivo photopolymerization has emerged as a transformative methodology for creating conductive polymer structures directly within living organisms. This technique enables the fabrication of soft, compliant bioelectronic interfaces that conform to tissue structures, thereby minimizing mechanical stress and improving functional integration [9] [1]. This application note details the comparative advantages, experimental protocols, and material considerations for utilizing in vivo photopolymerization to overcome the limitations of traditional bioelectronic implants, with specific focus on applications in neural interfacing and cardiac monitoring.
Comparative Analysis: Traditional vs. Photopolymerized Bioelectronics
The table below summarizes the key differences between traditional implanted electronics and devices formed via in vivo photopolymerization, highlighting critical aspects of biocompatibility and mechanical matching.
Table 1: Comparative Analysis of Traditional vs. Photopolymerized Bioelectronic Implants
| Characteristic | Traditional Bioelectronics | In Vivo Photopolymerized Bioelectronics |
|---|---|---|
| Material Composition | Rigid substrates (e.g., silicon, metals) [9] | Soft, organic materials (e.g., PEDOT-S, UV-PLCL) [9] [1] |
| Biocompatibility & Tissue Response | Often trigger inflammation, fibrosis, and scarring [9] [1] | High biocompatibility; reduced foreign body response [9] [1] |
| Mechanical Properties | Rigid, non-compliant; significant mechanical mismatch with tissues [9] | Soft, stretchable, and elastic; conforms to tissue surfaces [9] |
| Fabrication & Integration | Pre-fabricated, implanted surgically; limited conformability [1] | Formed in situ via photopolymerization; enables seamless, conformal integration [9] [1] |
| Structural Complexity | Excellent control over 2D electrode geometry [1] | Enables complex 3D, layered patterns and circuits in vivo [1] |
| Curing/Formation Time | Not applicable (pre-formed) | Short curing times (5–30 minutes) [1] |
Experimental Protocols
Protocol: In Vivo Photopolymerization of Conductive Patterns
This protocol describes the methodology for forming detailed, biocompatible conductive patterns within a living organism using photopolymerization, as adapted from recent research [1].
Objective: To create spatially controlled, conductive polymer electrodes in vivo for bioelectronic interfacing.
Materials & Reagents:
- Photoactive Monomer: 3Es (EDOT-trimers) and poly(3,4-ethylenedioxythiophene)butoxy-1-sulfonate (PEDOT-S) derivative A5.
- Light Source: Green (≈525 nm) or red (≈625 nm) light, selected for deeper tissue penetration and reduced phototoxicity.
- Photolithography Mask: A physical mask defining the desired 2D electrode pattern.
- Delivery System: A minimally invasive system for introducing the liquid monomer solution to the target site in vivo.
Procedure:
- Monomer Preparation: Prepare a solution of the 3Es and A5 monomers. The mixture is designed to remain stable until photoinitiated.
- Site Preparation: Perform a standard surgical procedure to expose the target tissue (e.g., brain cortex or cardiac muscle).
- Monomer Application: Apply the liquid monomer solution directly onto the target tissue surface.
- Mask Alignment: Carefully position the photolithography mask above the target area. The mask defines the geometry of the conductive pattern to be formed.
- In Vivo Photopolymerization: Expose the masked area to the green or red light source for a duration of 5 to 30 minutes. The light passes through the transparent regions of the mask, initiating a rapid polymerization reaction that solidifies the monomer into a conductive polymer (PEDOT-S) in the predefined pattern.
- Post-Processing & Validation: Gently rinse the area with a sterile physiological buffer to remove any unreacted monomer solution. The newly formed conductive pattern is now integrated with the tissue and ready for functional electrophysiological recording or stimulation.
Protocol: Fabrication of Multilayer, Transient Bioelectronic Sensors
This protocol outlines the steps for creating sophisticated, soft, and transient electronic devices using a layer-by-layer solution casting and photopatterning approach, as demonstrated for diagnostic and therapeutic applications [9].
Objective: To fabricate a multifunctional, biodegradable bioelectronic device for temporary spatiotemporal monitoring.
Materials & Reagents:
- Substrate/Insulator: UV-PLCL (Poly(l-lactide-co-ε-caprolactone) diol conjugated with acrylic acids).
- Semiconductor: A composite of PLCL polymer matrix and poly(3-hexylthiophene) (P3HT) nanofibrils with a diazirine crosslinker.
- Conductor: A solution of PEDOT:PSS, 2,4-hexadiyne-1,6-diol (HDD), and Zonyl FS-300 surfactant.
- Photoinitiators: TPO (2,4,6-Trimethylbenzoyldiphenylphosphine oxide) and TTMP (Trimethylolpropane tris(3-mercaptopropionate)).
Procedure:
- Fabricate the Biodegradable Substrate:
- Prepare a solution of UV-PLCL, TPO, and TTMP.
- Solution-cast the mixture and expose to 365 nm wavelength light to crosslink the monomer into an elastic, biodegradable substrate layer.
Pattern the Semiconducting Layer:
- Apply the P3HT/PLCL composite solution onto the substrate.
- Use a mask to define semiconductor patterns and expose to 365 nm light. The diazirine crosslinker forms a robust, stretchable semiconducting network.
Form the Conductive Traces:
- Apply the PEDOT:PSS/HDD conductor solution.
- Use a mask and expose to 254 nm UV light. This triggers the topochemical polymerization of HDD, creating polydiacetylene and transforming PEDOT into a highly conductive, water-resistant pattern.
- Optional: Enhance conductivity by secondary doping via immersion in methanol or 40% H₂SO₄ for 3 minutes, increasing conductivity to ~2000 S/cm [9].
Layer Integration: Repeat the solution-casting and photopatterning steps to build additional functional layers (e.g., sensors, capacitors, microheaters) in a monolithic 3D structure.
Implantation and Function:
- The ultrathin (≈3 μm) and soft device can be implanted for applications like neural recording or cardiac pacing.
- The device operates for a designed lifespan before harmlessly dissolving via hydrolysis of the PLCL ester bonds, typically over several weeks [9].
The Scientist's Toolkit: Essential Research Reagents & Materials
The following table catalogues the key materials required for developing and applying in vivo photopolymerized bioelectronics.
Table 2: Essential Research Reagents and Materials for In Vivo Photopolymerization
| Material/Reagent | Function/Description | Key Characteristics |
|---|---|---|
| PEDOT-S / 3Es Monomers [1] | Photoactive precursors that form conductive polymer patterns (PEDOT) in vivo. | Polymerize under green/red light; form biocompatible conductors. |
| UV-PLCL [9] | A photopolymerizable, biodegradable elastomer used as substrate and insulator. | Soft, elastic; degrades via hydrolysis; excellent mechanical match for soft tissues. |
| P3HT Nanofibrils [9] | A semiconducting material used to create stretchable electronic components. | High carrier mobility; can be crosslinked into a PLCL matrix for durability. |
| PEDOT:PSS with HDD [9] | A conductor formulation that becomes patternable and water-resistant upon UV exposure. | HDD crosslinks into polydiacetylene under 254 nm light; enables high-conductivity traces. |
| TPO & TTMP [9] | Photoinitiator and crosslinking enhancer for the UV-PLCL substrate. | Enables free radical polymerization of UV-PLCL under 365 nm light in ambient conditions. |
| Diazirine Crosslinker [9] | Crosslinking agent for the P3HT/PLCL semiconductor composite. | Forms carbene under 365 nm light, creating strong C-H insertions for a robust network. |
Workflow and Signaling Visualization
The following diagram illustrates the logical workflow and key advantages of creating bioelectronic interfaces via in vivo photopolymerization compared to the traditional implant approach.
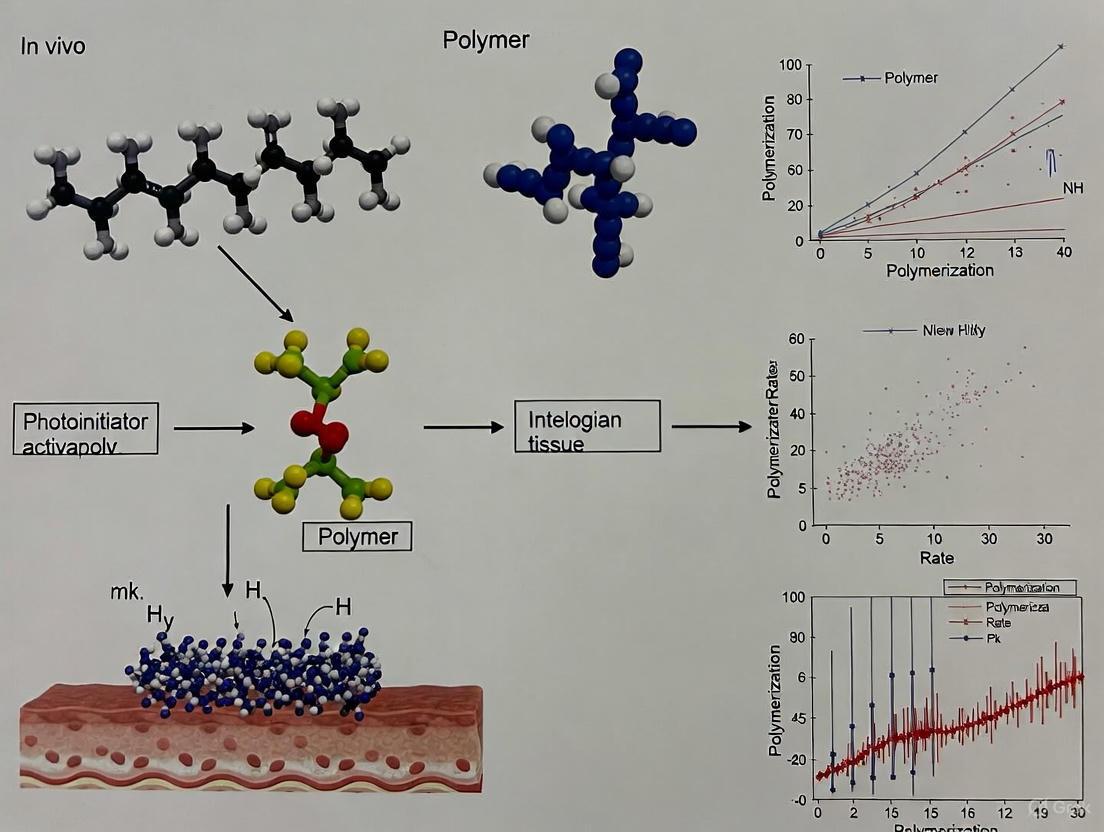
The development of soft, biocompatible electronics is crucial for advanced medical applications, including precise neural interfaces, implantable sensors, and targeted therapeutic devices. Traditional rigid implants often provoke inflammatory responses and fibrotic scarring, leading to a loss of function over time. In vivo photopolymerization has emerged as a transformative methodology, enabling the direct formation of conductive hydrogels within living tissue. This protocol outlines the process of creating patterned conductive structures in situ using light, a technique that provides superior spatial control over electrode geometry compared to other in situ methods while maintaining excellent biocompatibility. The process involves the photopolymerization of novel photoactive monomers into conductive polymers such as poly(3,4-ethylenedioxythiophene) (PEDOT) derivatives, defined by photolithography masks, to form complex, layered circuits directly within a biological environment [1] [10].
Materials and Reagents
Research Reagent Solutions
The following table details the essential materials required for the in vivo photopolymerization process.
Table 1: Key Research Reagents and Materials for In Vivo Photopolymerization
| Item Name | Function/Description | Key Characteristics |
|---|---|---|
| 3E Monomers (e.g., 3E-S, 3E-COONa) [10] | Photoactive EDOT-trimer precursors that form the conductive polymer backbone. | Lower oxidation potential than ETE derivatives; water-soluble sulfonate or carboxylate groups for biocompatibility. |
| PEDOT-S Variant (A5) [10] | A pre-formed conductive polymer nanoparticle that forms a temporary ion-absorbing hydrogel in vivo. | Serves as a scaffold; photopolymerizing 3Es within it enhances pattern stability. |
| Rose Bengal [10] | A photocatalyst for polymerization under visible (green) light. | Enables polymerization with green light (550 nm); follows a single-electron transfer (SET) mechanism. |
| SIR-COOH [10] | A far-red absorbing photocatalyst. | Allows polymerization with red light (621 nm) for deeper tissue penetration. |
| Photolithography Masks [1] [10] | High-precision masks that define the spatial pattern of light exposure. | Enables the creation of detailed and specific 2D and 3D conductive patterns in vivo. |
| Alginate-based Hydrogels [11] | A biocompatible polymer matrix for creating injectable conductive composites. | Can be ionically cross-linked; provides a soft, tissue-matching environment for electronics. |
| PEDOT:AlgS [11] | A conductive polymer with alginate as a hydrophilic dopant instead of PSS. | Enhances water dispersibility and biodegradability; boosts hydrogel conductivity. |
Monomer and Polymer Properties
The selection of monomers is critical for successful photopolymerization under biologically relevant conditions. The 3E monomer family was specifically designed for this purpose, offering lower oxidation potentials and improved compatibility with aqueous systems compared to earlier derivatives [10].
Table 2: Characteristics of 3E Monomer Derivatives
| Monomer | Oxidation Potential (V vs. Ag/AgCl) | Key Functional Group | Light Source & Catalyst |
|---|---|---|---|
| 3E-S | 0.47 | Sulfonate | Green Light (550 nm) / Rose Bengal |
| 3E-COONa | 0.10 | Carboxylate | Far-UV (385 nm) or Red Light (621 nm) / SIR-COOH |
| 3E-PC | 0.05 | Phosphorylcholine | Not Specified |
Experimental Protocols
Workflow for In Vivo Photopolymerization
The following diagram illustrates the core experimental workflow for forming a patterned conductive hydrogel within a biological tissue.
Protocol 1: Pre-forming the Transient A5 Hydrogel Scaffold
- Solution Preparation: Prepare an aqueous solution of the PEDOT-S variant A5. This solution consists of nanoparticles that will self-assemble into a temporary conductive hydrogel upon injection.
- In Vivo Injection: Using a standard syringe or catheter, inject the A5 solution into the target tissue site in the animal model (e.g., zebrafish or chicken embryo).
- Scaffold Formation: The A5 nanoparticles will rapidly absorb ions from the surrounding biological tissue, leading to aggregation and the formation of a transient, conductive hydrogel scaffold. This scaffold temporarily occupies the space where the permanent pattern will be formed [10].
Protocol 2: Photopolymerizing 3E Monomers for Patterned Electrodes
- Ink Formulation: Prepare the photopolymerizable ink. This involves dissolving the chosen 3E monomer (e.g., 3E-COONa at 0.4 mg mL⁻¹) in a biocompatible buffer. Add the appropriate photocatalyst:
- Ink Injection and Mask Alignment: Inject the ink into the same site as the pre-formed A5 hydrogel. Carefully align a photolithography mask directly above or on the tissue surface. The mask contains the negative of the desired conductive pattern (e.g., lines, electrodes, or complex circuits) [1] [10].
- Light Exposure and Polymerization: Expose the masked area to the corresponding light source.
- Green Light: 550 nm wavelength at an intensity of 65 mW cm⁻² for 5 minutes.
- Red Light: 621 nm wavelength for up to 15 minutes. The light penetrates the tissue and passes through the transparent regions of the mask, initiating the photocatalytic reaction only in the exposed areas.
- Reaction Mechanism: The photocatalyst absorbs light and enters an excited state, triggering a Single-Electron Transfer (SET) mechanism. This process consumes oxygen and generates hydrogen peroxide in situ, which acts as an oxidant. The 3E monomers are polymerized into conjugated, conductive polythiophene chains within the A5 hydrogel matrix [10].
- Pattern Formation and Stabilization: After the light exposure, the unreacted monomer solution in the masked areas can be gently flushed away. The result is a stable, patterned conductive hydrogel integrated with the native tissue, with geometry defined by the photomask.
Performance Metrics and Characterization
The resulting conductive hydrogels can be characterized using the following key performance metrics, which demonstrate the efficacy of this approach.
Table 3: Performance Metrics of Photopolymerized Conductive Hydrogels
| Parameter | Typical Result/Value | Method of Analysis / Significance |
|---|---|---|
| Curing Time | 5 - 30 minutes [1] [10] | Dictates practical feasibility for in vivo procedures. |
| Light Wavelength | Green (550 nm) or Red (621 nm) [10] | Determines tissue penetration depth and biocompatibility. |
| Spatial Control | Specific, layered, and complex 3D patterns [1] | Enabled by photolithography masks; superior to diffusion-controlled methods. |
| Conductivity Enhancement | 20-fold increase in conductivity vs. conventional methods [11] | Achieved via hydrophilic dopants (e.g., PEDOT:AlgS); critical for device performance. |
| Dispersibility | 5-fold increase in aqueous dispersibility [11] | Allows for higher conductive filler loading in hydrogels. |
| Biocompatibility | Confirmed in zebrafish and chicken embryo models [10] | Essential for all in vivo applications. |
The Photopolymerization Mechanism
The chemical transformation from liquid monomer to solid conductive polymer is governed by a photocatalytic cycle. The following diagram details the Single-Electron Transfer (SET) mechanism, which is central to the reaction's success in an aqueous, biological environment.
Mechanism Explanation: The process begins when the photocatalyst (e.g., Rose Bengal or SIR-COOH) absorbs a photon of light and transitions to an excited state. This excited photocatalyst then interacts with dissolved oxygen, leading to the formation of hydrogen peroxide within the reaction zone. The generated hydrogen peroxide acts as a mild oxidant, which removes an electron from the 3E monomer to form a radical cation. This radical cation is highly reactive and initiates the chain propagation step, whereby it couples with other monomer units and radical cations, ultimately forming the long-chain, conjugated conductive polymer (e.g., PEDOT-S) that constitutes the final solid hydrogel [10]. This SET mechanism is crucial as it allows the use of benign visible light and generates reactants in situ, making it compatible with living tissues.
The development of in vivo-formed bioelectronics represents a paradigm shift for neural interfaces and therapeutic applications, aiming to overcome the mechanical mismatch and foreign body response associated with conventional pre-fabricated, rigid implants [12]. In vivo photopolymerization has emerged as a transformative approach for creating precisely patterned, soft conductive structures directly within living tissue [1] [4]. This methodology enables the formation of bioelectronic devices that integrate seamlessly with biological systems, offering unprecedented compatibility and minimal invasiveness.
Central to this technological advancement are two key material systems: PEDOT-S derivatives and novel 3E monomers (EDOT-based trimers) [10]. These conjugated molecules can be photopolymerized using biocompatible light sources to form conductive hydrogels and patterned electrodes in situ. Unlike enzymatically catalyzed conductive polymers which require hours to days for formation and offer limited spatial control, photopolymerization enables precise patterning within 5-30 minutes using visible light [1]. This breakthrough allows researchers to create complex, multi-layered circuits directly in vivo, opening new possibilities for interfacing with biological systems.
Material Properties and System Components
3E Monomers (EDOT-Trimers)
The 3E monomer family comprises sulfonated EDOT-based trimers specifically engineered for photopolymerization under physiological conditions. These molecules feature a lower oxidation potential compared to earlier EDOT derivatives, facilitating rapid polymerization with minimal energy input [10].
- 3E-S (EDOT-EDOT(S)-EDOT): The sulfonate-substituted core structure with oxidation potential of 0.47 V [10].
- 3E-COONa: Carboxylate variant with oxidation potential of 0.10 V versus Ag/AgCl [10].
- 3E-PC: Phosphorylcholine derivative with exceptionally low oxidation potential of 0.05 V versus Ag/AgCl [10].
The molecular design of 3E monomers incorporates hydrophilic substituents that enhance water solubility and biointegration while maintaining the conjugated backbone necessary for electrical conductivity after polymerization.
PEDOT-S Derivative A5
The PEDOT-S variant known as A5 (poly(3,4-ethylenedioxythiophene)butoxy-1-sulfonate) serves as a complementary component that forms conductive nanoparticles in aqueous solutions [10]. When introduced into biological environments, A5 nanoparticles spontaneously aggregate into temporary conductive hydrogels through absorption of ions from the surrounding tissue. This property enables the initial formation of a conductive matrix that can be subsequently stabilized and patterned through photopolymerization with 3E monomers.
Photocatalyst Systems
- Rose Bengal: Xanthene-based photocatalyst activated by green light (550 nm, 65 mW cm⁻²) with typical loading of 1-4% relative to monomer [10].
- SIR-COOH: Silicon-rhodamine analog excitable by red light (621 nm), enabling deeper tissue penetration and operating within the therapeutic optical window (600-1300 nm) [10].
Table 1: Key Material Components for In Vivo Photopolymerization
| Component | Chemical Classification | Key Properties | Role in Photopolymerization |
|---|---|---|---|
| 3E-S | Sulfonated EDOT trimer | Oxidation potential: 0.47 V; Water-soluble | Primary monomer forming conductive polymer backbone |
| 3E-COONa | Carboxylated EDOT trimer | Oxidation potential: 0.10 V; Enhanced biocompatibility | Functional monomer for tuned material properties |
| A5 | PEDOT-S derivative | Forms nanoparticle hydrogels in ionic solutions | Creates temporary conductive scaffold for patterning |
| Rose Bengal | Xanthene dye | Green light absorption (550 nm); 1-4% catalyst loading | Photocatalyst for oxidative polymerization |
| SIR-COOH | Silicon-rhodamine dye | Red light excitation (621 nm); Tissue penetration | Enables deep-tissue photopolymerization |
Quantitative Performance Characteristics
The performance of photopolymerized conductive structures depends critically on formulation parameters and processing conditions. Systematic characterization reveals key relationships between material composition and functional outcomes.
Table 2: Photopolymerization Parameters and Outcomes for 3E Monomers
| Monomer | Light Wavelength | Catalyst | Catalyst Loading | Time | Conversion | Conductivity |
|---|---|---|---|---|---|---|
| 3E-S (0.4 mg/mL) | 385 nm (UV) | None | 0% | 5 min | High | Comparable to enzymatic controls |
| 3E-S (0.4 mg/mL) | 550 nm (Green) | Rose Bengal | 4% | 5 min | >90% | Comparable to enzymatic controls |
| 3E-S (0.4 mg/mL) | 621 nm (Red) | SIR-COOH | 4% | 15 min | 70-80% | Slightly lower than green light |
| 3E-COONa (0.4 mg/mL) | 550 nm (Green) | Rose Bengal | 4% | 5 min | >90% | Comparable to enzymatic controls |
| 3E (4 mg/mL) | 550 nm (Green) | Rose Bengal | 4% | 5 min | Reduced (light absorption) | Requires increased surface area:volume |
The polymerization efficiency exhibits a strong dependence on catalyst concentration, with 4% Rose Bengal loading achieving near-complete monomer conversion within 5 minutes. Higher monomer concentrations (4 mg/mL versus 0.4 mg/mL) reduce reaction efficiency due to inner filter effects, necessitating optimized geometrical configurations to maintain performance [10].
Experimental Protocols
Protocol 1: In Vivo Photopolymerization for Zebrafish Embryos
This protocol describes the formation of conductive patterns in zebrafish embryos, a established model for in vivo bioelectronic integration [10].
Materials and Reagents:
- 3E monomer solution (0.4 mg/mL in physiological buffer)
- Rose Bengal catalyst stock solution (2 mM in water)
- A5 nanoparticle dispersion (1 mg/mL in water)
- Custom light source with 550 nm filter (65 mW cm⁻² intensity)
- Glass capillaries for microinjection (1-2 μm tip diameter)
- Zebrafish embryos (24-48 hours post-fertilization)
Procedure:
Solution Preparation: Prepare working solution by mixing 3E monomer (0.4 mg/mL final concentration) with Rose Bengal (4% molar ratio relative to monomer) in physiological buffer.
Microinjection: Load working solution into glass capillary and inject approximately 10-50 nL into target region of zebrafish embryo using standard microinjection techniques.
Photomask Alignment: Position photolithography mask defining desired electrode pattern between light source and embryo. For simple geometries, direct illumination without masking may be employed.
Photopolymerization: Expose injected region to green light (550 nm, 65 mW cm⁻²) for 5 minutes. Monitor formation of dark blue-green coloration indicating polymer formation.
Validation: Confirm conductivity and pattern fidelity using electrochemical impedance spectroscopy or microscopic examination.
Troubleshooting Tips:
- Incomplete polymerization may indicate insufficient catalyst concentration - increase Rose Bengal to 4% minimum.
- Tissue damage can result from excessive light intensity - maintain ≤65 mW cm⁻² for green light.
- Poor pattern resolution suggests light scattering - utilize red light (621 nm) with SIR-COOH for deeper penetration.
Protocol 2: Multi-Material Layering in Chicken Embryos
This advanced protocol enables creation of layered conductive structures through sequential photopolymerization, demonstrating the potential for complex 3D bioelectronic circuits [10].
Materials and Reagents:
- 3E-S monomer solution (0.4 mg/mL)
- A5 nanoparticle dispersion (1 mg/mL)
- SIR-COOH catalyst (2 mM in DMSO)
- Chicken embryos (embryonic day 3-5)
- Multiple photomasks with complementary patterns
- Dual-wavelength light source (550 nm and 621 nm)
Procedure:
A5 Hydrogel Formation: Inject A5 nanoparticle dispersion (50-100 nL) into target tissue region. Allow 10-15 minutes for natural hydrogel formation via ion absorption from tissue.
First Layer Patterning: Mix 3E-S monomer with SIR-COOH catalyst (4% molar ratio) and inject into A5 hydrogel matrix. Apply first photomask and expose to red light (621 nm) for 15 minutes to create initial conductive layer.
Second Layer Addition: Inject additional monomer-catalyst solution over first polymerized layer. Apply second photomask with complementary pattern and expose to red light for 15 minutes to create layered conductive architecture.
Integration Assessment: Examine layer interface via microscopy and characterize electrical connectivity between layers using custom microelectrodes.
Technical Notes:
- A5 hydrogel provides temporary conduction during patterning process
- Red light enables deeper tissue penetration for multi-layer structures
- Total procedure time: 45-60 minutes including hydrogel formation
Figure 1: Experimental workflow for in vivo photopolymerization of conductive patterns, illustrating key steps from solution preparation to functional interface validation.
The Scientist's Toolkit: Essential Research Reagents
Table 3: Key Research Reagent Solutions for In Vivo Photopolymerization
| Reagent/Chemical | Function/Application | Working Concentration | Special Handling |
|---|---|---|---|
| 3E-S Monomer | Primary conductive polymer precursor | 0.4 mg/mL in physiological buffer | Light-sensitive; store protected from light |
| Rose Bengal | Green-light photocatalyst | 1-4% molar ratio relative to monomer | Prepare fresh solutions before use |
| SIR-COOH | Red-light photocatalyst | 4% molar ratio relative to monomer | DMSO stock solution; stable at 4°C |
| A5 Nanoparticles | Temporary conductive scaffold | 1 mg/mL in aqueous solution | Forms hydrogels in ionic environments |
| Physiological Buffer | Biocompatible solvent system | 1X concentration | Match osmolarity to target tissue |
| Photolithography Masks | Define electrode geometry | Custom patterns | Resolution down to 100 μm demonstrated |
Mechanism and Pathway Analysis
The photopolymerization process follows a single-electron transfer (SET) mechanism with oxygen consumption and hydrogen peroxide formation as key aspects of the reaction pathway [10]. Understanding this mechanism is essential for optimizing reaction conditions and troubleshooting failed polymerizations.
Figure 2: Photopolymerization mechanism pathway showing key steps from photon absorption to conductive network formation, highlighting the role of oxygen consumption and hydrogen peroxide formation.
Critical aspects of the mechanism include:
Photoinitiation: Photocatalyst excitation followed by single electron transfer from 3E monomer to excited catalyst, generating monomer radical cations.
Oxygen Dependency: Molecular oxygen serves as terminal electron acceptor, being consumed during the reaction and generating hydrogen peroxide as a byproduct.
Chain Propagation: Radical cations undergo coupling and deprotonation to form dimers, trimers, and eventually extended conjugated polymers.
Network Formation: In the presence of A5 nanoparticles, the growing polymer chains integrate with the existing conductive scaffold, enhancing mechanical stability and electrical continuity.
Evidence for this mechanism includes the observation that reaction cessation occurs when light is removed, with polymerization resuming only upon re-illumination. Furthermore, addition of catalase (which decomposes hydrogen peroxide) prevents further monomer conversion when added during the reaction, confirming the essential role of peroxide in the propagation cycle [10].
Applications and Integration Strategies
Photopolymerized PEDOT-S and 3E structures enable numerous advanced bioelectronic applications, particularly in neural interfaces and regenerative medicine. The technology demonstrates special promise for minimally invasive formation of conformal electrodes on soft, dynamic tissues like the brain [12] [4].
The resulting bioelectronics exhibit mechanical properties (elastic modulus ~0.1-10 MPa) much closer to neural tissue (1-4 kPa) than conventional metal electrodes (GPa range), significantly reducing inflammatory response and improving long-term signal stability [12]. The capability to create multi-layered, patterned circuits directly in living organisms enables sophisticated bioelectronic systems for precise neural stimulation and recording.
Integration with existing biomedical technologies includes:
- Neural Prosthetics: Forming conformal electrode arrays on peripheral nerves for advanced prosthetic control
- Deep Brain Stimulation: Creating soft electrode interfaces for treating Parkinson's disease and epilepsy
- Cardiac Pacemaking: Generating biocompatible conduction pathways for arrhythmia treatment
- Drug Delivery Systems: Combining conductive pathways with controlled release mechanisms
The photopolymerized structures naturally degrade after use without requiring surgical explanation, addressing a significant limitation of conventional bioelectronic implants [4].
Implementing In Vivo Photopolymerization: Techniques and Therapeutic Applications
The development of advanced bioelectronic devices for neural interfacing, targeted stimulation, and physiological monitoring relies on the ability to fabricate detailed, high-fidelity microelectrodes. Spatial patterning using photolithography masks is a foundational technique in this endeavor, enabling the precise definition of conductive traces and electrode sites at the micro-scale [13]. Within the broader context of a thesis on in vivo photopolymerization for bioelectronics, this methodology provides a critical bridge between design and realization. It allows for the creation of devices that are not only functionally complex but also mechanically compliant and biocompatible, which are essential characteristics for successful in vivo integration and long-term stability [14] [15]. This document provides detailed application notes and protocols for utilizing photolithography masks to fabricate detailed electrodes, specifically framed for research in bioelectronics.
Underlying Principles and Key Comparisons
Photolithography is a process that uses light to transfer a geometric pattern from a photomask to a light-sensitive chemical photoresist on a substrate. In bioelectronics, this process defines the intricate patterns of metal (e.g., gold, platinum, copper) that form electrodes and interconnects on various substrates, including rigid silicon and flexible polymers.
A critical challenge in bioelectronic medicine is ensuring the long-term reliability and stability of implanted devices. The definitions of these key performance metrics are as follows [14]:
- Reliability: The probability that a device functions as intended without failure over a specified period under expected conditions.
- Stability: The ability of a device to maintain its functional and structural properties over time, resisting environmental and biological fluctuations.
- Durability: The physical resilience of a device to withstand external stresses like mechanical deformation and exposure to bodily fluids.
- Longevity: The total operational lifespan of a device before it becomes non-functional.
Different lithographic techniques offer varying balances of resolution, cost, and material compatibility. The table below summarizes key patterning technologies relevant to bioelectronics research.
Table 1: Comparison of Lithographic Techniques for Bioelectronic Fabrication
| Technique | Brief Summary | Resolution | Key Advantages | Key Disadvantages |
|---|---|---|---|---|
| UV Lithography [16] | Uses UV light and a mask to pattern a photoresist. | ≈1 µm | Simple, efficient, parallel processing allows mass production [16]. | Requires a cleanroom; resolution limited by diffraction; substrate must be flat [16]. |
| Two-Photon Lithography [16] | Uses UV light for patterning via two-photon polymerization. | ≈150 nm | Able to generate complex 3D structures [16]. | Time-expensive for large structures; large amount of data storage required [16]. |
| Electron Beam Lithography (EBL) [16] | Uses a focused electron beam to pattern a resist. | >10 nm | Precise control; can pattern complex geometries [16]. | Low throughput; complex and costly; proximity effect causes distortions [16]. |
| Cleanroom-Free Toolkit [15] | Integrates two-photon laser writing on a Parylene-C (PaC) mask and mask transfer. | Submicron | Cleanroom-free; compatible with solvent-sensitive biomaterials and flexible substrates like PDMS [15]. | Resolution limited by the mask material ablation process (not the laser itself) [15]. |
Experimental Protocols
Protocol: Photolithographic Fabrication of a Micro-electrode on a Carbon Steel Substrate
This protocol is adapted from a study demonstrating the fabrication of micro-electrodes for local hydrogen permeation measurements [13]. It highlights the use of an adhesion-promoting silica interlayer, a critical step for ensuring durability in electrochemical environments.
I. Research Reagent Solutions
Table 2: Essential Materials and Reagents
| Item | Function/Description | Example/Note |
|---|---|---|
| Substrate | Base material for the electrode. | Carbon steel sheet, iron sheet (99.99% Fe) [13]. |
| Silica Precursors | Forms an adhesive and resistant inner layer. | Tetraethoxysilane (TEOS), Glycidyl 3-trimethoxysilylpropyl ether (GPTMS) [13]. |
| Positive Photoresist | Light-sensitive polymer for patterning. | OFPR-800 (Tokyo Ohka Kogyo) [13]. |
| Developer | Removes exposed regions of the photoresist. | NMD-3 (2.38% tetramethylammonium hydroxide) [13]. |
| Reactive Ion Etching (RIE) Gas | Removes the silica layer from exposed areas. | CHF3 gas [13]. |
II. Step-by-Step Methodology
- Substrate Preparation: Mechanically polish the steel or iron substrate to a fine finish (e.g., using #4000 SiC paper or 0.04 µm colloidal silica) [13].
- Silica Interlayer Deposition (Adhesion Promotion): a. Prepare a silica sol by mixing TEOS (or a mixture of TEOS and GPTMS) with ethanol in a 1:1 volumetric ratio. Add 1 mass% acetic acid or 0.004 M hydrochloric acid to catalyze the reaction and stir for at least 30 minutes [13]. b. Deposit the silica sol onto the substrate via spin-coating (e.g., 1500 rpm for 60 s, then 100 rpm for 60 s). c. Heat the coated specimen at 383 K (110 °C) for 15 minutes to 3 hours to form the silica layer [13].
- Photoresist Application: a. Spin-coat the positive photoresist (e.g., OFPR-800) onto the silica-coated surface at 2000 rpm for 60 s. b. Pre-bake the resist by heating at 368 K (95 °C) for 1.8 ks (30 minutes) to evaporate the solvent [13].
- Exposure and Development: a. Locally expose the photoresist to 405 nm wavelength light through a photomask defining the circle-shaped (or other) micro-electrode pattern. b. Immerse the specimen in the developer (NMD-3) to dissolve the exposed regions of the photoresist, revealing the underlying silica layer. c. Rinse with deionized water and perform a post-bake at 413 K (140 °C) for 30 minutes to harden the remaining resist [13].
- Silica Layer Etching: a. Use Reactive Ion Etching (RIE) with CHF3 gas (flow rate: 10 sccm, RF power: 100 W) to remove the silica layer from the exposed circular area, thereby unshrouding the underlying metal electrode surface [13].
- Final Processing: The device is now ready for electrochemical characterization (e.g., cathodic polarization) or integration into a larger bioelectronic system. The photoresist and silica layer together act as a robust insulating layer.
Protocol: Cleanroom-Free, Submicron Patterning on Flexible Substrates
This modern protocol outlines a simplified, cleanroom-free toolkit for patterning intricate bioelectronics on flexible substrates like PDMS, which is crucial for conformable in vivo devices [15].
Workflow Overview
Detailed Methodology
Step A: Direct Laser Writing Mask
- Begin by chemically vapor depositing (CVD) a 1-2 µm thick layer of Parylene-C (PaC) onto a pre-soaped glass substrate (soaping aids subsequent peel-off) [15].
- Use a two-photon laser to ablate and create the desired submicron electrode pattern directly into the PaC layer. This PaC layer serves as the physical etch mask.
Step B: Mask Transfer to Flexible Substrate Two primary strategies are employed:
- Strategy B1 (for optimal mask-substrate contact): Spin-coat uncured PDMS onto the PaC-on-glass substrate. Place the PaC mask face-down onto the PDMS. Use a vacuum to remove air gaps, then thermally cure the PDMS. Finally, peel off the glass substrate, leaving the PaC mask adhered to the PDMS [15].
- Strategy B2 (using Water-Soluble Adhesive - WSA): Use a layer of water-soluble adhesive (e.g., PVA-based 3M 5414) to peel the PaC mask from the glass and transfer it to the target flexible substrate. The WSA is later dissolved in water [15].
Step C: Material Deposition and Patterning
- With the PaC mask securely on the substrate, deposit the functional material (e.g., metal for electrodes) using a dry process like Physical Vapor Deposition (PVD) or a wet process like spin-coating [15].
- The pattern is achieved by peeling off the PaC mask (a "lift-off" process), leaving behind the material deposited only in the patterned areas [15].
Step D: Multi-layer/Material Assembly
- For complex devices with multiple layers, use the PaC mask in conjunction with WSA and a micron-precision aligner (e.g., Finetech aligner) for additive materials processing [15].
- This allows for precise alignment of subsequent layers of electrodes, insulators, and encapsulation, enabling the fabrication of intricate bioelectronic devices like transistor arrays and multi-electrode probes entirely without a cleanroom [15].
Application Notes & Troubleshooting
- Adhesion Failure: Poor adhesion of the photoresist to metal substrates is a common issue, leading to peeling during development or electrochemical testing [13]. The protocol in Section 3.1 directly addresses this by implementing a silica interlayer derived from TEOS or a TEOS/GPTMS mixture, which significantly improves durability and impedance in acidic environments [13].
- Material Compatibility for In Vivo Use: Traditional lithography uses solvents and resists that can degrade sensitive biomaterials. The cleanroom-free toolkit in Section 3.2 is specifically designed to be compatible with a wider range of functional and encapsulation biomaterials, as it avoids aggressive solvents and uses a physical PaC mask [15].
- Substrate Flexibility: Standard photolithography requires exceptionally flat, rigid substrates. The phase mismatch between a stiff photoresist and a soft elastomer like PDMS can lead to cracking [15]. The cleanroom-free method, which transfers a flexible PaC mask directly onto PDMS or other conformable surfaces, overcomes this limitation and is ideal for flexible and implantable bioelectronics [15].
- Resolution vs. Practicality: While EBL and two-photon lithography offer nanometer resolution, many bioelectronic applications (e.g., neural electrodes) require only submicron resolution. The cleanroom-free toolkit achieves this submicron resolution at a lower cost and complexity, making it highly practical for research labs [15].
The integration of bioelectronics within living organisms presents a unique challenge: creating conductive structures that are both biocompatible and geometrically precise. Traditional implanted electrodes often cause inflammation and scarring due to their rigidity and mechanical mismatch with soft biological tissues [10] [4]. While in situ-formed conductive polymers offer improved biocompatibility, they typically lack spatial control, with curing times spanning several hours to days [10] [1].
Photopolymerization using green and red light has emerged as a transformative strategy to overcome these limitations. This approach enables the direct formation of soft, conductive materials within the body using wavelengths that penetrate tissue effectively and minimize photodamage [10] [4]. The following application notes detail the specific parameters, protocols, and material considerations for implementing these light source strategies in deep-tissue curing for advanced bioelectronics.
Light Parameter Comparison and Selection
Selecting the appropriate wavelength is critical for balancing tissue penetration, curing efficiency, and biocompatibility. The table below summarizes the key characteristics of green and red light for photopolymerization in vivo.
Table 1: Comparative Analysis of Green and Red Light for In Vivo Photopolymerization
| Parameter | Green Light Strategy | Red Light Strategy |
|---|---|---|
| Wavelength | 550 nm [10] | 621 nm [10] |
| Photocatalyst | Rose Bengal [10] | SIR-COOH [10] |
| Typical Curing Time | 5 minutes [10] | 15 minutes [10] |
| Light Intensity | 65 mW cm⁻² [10] | Information not specified in search results |
| Tissue Penetration | Moderate | Superior (Within the near-infrared window of 600-1300 nm) [10] |
| Polymerization Outcome | Standard polymer formation | Enhanced higher-order structure formation (e.g., trimers) [10] |
| Key Advantage | Rapid curing | Deeper tissue penetration and complex polymer structures |
Experimental Protocols
Protocol A: Photopolymerization with Green Light
This protocol describes the formation of conductive polymers within a tissue environment using green light activation, ideal for applications requiring rapid curing [10].
Materials Required:
- Monomer solution: 3E-S derivative (0.4 - 4 mg mL⁻¹ in aqueous solution) [10].
- Photocatalyst: Rose Bengal (4% catalyst loading relative to monomer) [10].
- Light Source: LED lamp emitting at 550 nm, capable of delivering 65 mW cm⁻² at the target site [10].
- Photomask (optional): For defining precise conductive patterns [10] [1].
- Animal model (e.g., zebrafish or chicken embryo) [10].
Procedure:
- Monomer-Catalyst Preparation: Mix the 3E-S monomer solution with Rose Bengal photocatalyst to achieve a final catalyst loading of 4% (w/w). Protect the solution from ambient light until irradiation [10].
- In Vivo Administration: Introduce the prepared monomer-catalyst solution into the target tissue of the animal model via injection or other suitable delivery methods [10].
- Light Exposure:
- Curing Validation: A successful reaction is indicated by a visible color change to a dark blue-green hue at the polymerization site. The resulting material is a soft, conductive hydrogel integrated with the surrounding tissue [10] [4].
Protocol B: Photopolymerization with Red Light
This protocol utilizes red light for deeper tissue penetration and the formation of more complex conductive polymer structures, suitable for targets beneath more substantial tissue layers [10].
Materials Required:
- Monomer solution: 3E-S or 3E-COONa derivative (0.4 mg mL⁻¹ in aqueous solution) [10].
- Photocatalyst: SIR-COOH [10].
- Light Source: LED lamp emitting at 621 nm [10].
- Photomask (optional) [10] [1].
- Animal model [10].
Procedure:
- Monomer-Catalyst Preparation: Combine the 3E monomer with the SIR-COOH photocatalyst. The exact optimal catalyst loading should be determined empirically, following the principle of increasing conversion with higher catalyst load [10].
- In Vivo Administration: Administer the solution to the target tissue in vivo [10].
- Light Exposure: Irradiate the target area with 621 nm red light for approximately 15 minutes. Use a photomask for spatial control if needed [10] [1].
- Curing Validation: Confirm polymerization via the characteristic dark blue-green color and an additional absorption band at 800 nm, which indicates an oxidized polymer and the potential formation of higher-order oligomers like trimers [10].
Workflow and Signaling Pathway
The following diagram illustrates the logical workflow and the underlying Single Electron Transfer (SET) mechanism for the photopolymerization process in vivo.
Diagram 1: In Vivo Photopolymerization Workflow and Mechanism. This diagram outlines the experimental sequence from monomer administration to the formation of a conductive hydrogel within tissue, including the key Single Electron Transfer (SET) chemical mechanism driven by light.
The Scientist's Toolkit: Research Reagent Solutions
Successful implementation of these light strategies requires specific materials. The table below lists essential reagents and their functions.
Table 2: Key Reagents for In Vivo Photopolymerization
| Reagent | Function / Rationale |
|---|---|
| 3E Monomers (3E-S, 3E-COONa) | Novel EDOT-trimer monomers with low oxidation potential, enabling polymerization under mild, biocompatible conditions with visible light [10]. |
| Rose Bengal | A photocatalyst activated by green light (550 nm) to initiate the oxidative polymerization reaction via a SET mechanism [10]. |
| SIR-COOH | A far-red-shifted rhodamine analog photocatalyst that allows activation with deeper-penetrating red light (621 nm) [10]. |
| A5 (PEDOT-S derivative) | A conductive polymer nanoparticle that forms a temporary ion-linked hydrogel in vivo, providing a scaffold for the photopolymerized structure [10]. |
| Photolithography Masks | Physical masks used to block light in specific patterns, enabling the creation of detailed and layered 2D and 3D conductive circuits directly in tissue [10] [1]. |
The development of layered and 3D circuitry within the body represents a frontier in bioelectronic medicine, enabling advanced therapeutic and diagnostic capabilities. In vivo photopolymerization has emerged as a transformative approach for creating conformal, biocompatible electronic interfaces directly on or within biological tissues. This paradigm shift moves beyond traditional rigid implants toward soft, seamless biointegrated devices that can monitor and modulate physiological processes with high precision. The convergence of vat photopolymerization (VP) techniques from additive manufacturing with bioelectronic materials creates unprecedented opportunities for forming complex conductive structures in situ.
Recent advances in visible-light-induced polymerization of water-soluble conducting polymer precursors now enable direct formation of high-performance organic mixed ion-electron conductors (OMIECs) on biological surfaces [17]. This initiator-free photochemical process allows seamless film deposition and manufacturing of organic electrochemical transistors (OECTs) across rigid, flexible, and biological substrates, including direct application to mouse skin in vivo. These OMIECs provide unique coupled dual charge transport characteristics alongside mechanical softness, biocompatibility, and stability—essential properties for functional bioelectronic interfaces [17].
Current Technical Approaches and Quantitative Performance
Photopolymerization Techniques for Bioelectronics
Vat photopolymerization (VP) technologies encompass several light-based additive manufacturing techniques capable of creating high-resolution 3D structures from liquid resins. For bioelectronic applications, the most relevant VP modalities include:
- Digital Light Processing (DLP): Projects planar 2D images for layer-by-layer fabrication, enabling rapid production of complex structures with feature sizes determined by pixel resolution (∼1-100 μm) [18].
- Stereolithography (SLA): Utilizes a laser raster-scanned along the vat volume to crosslink resin in a point-by-point manner, achieving high precision for biomedical constructs [19].
- Multi-photon Lithography (MPL): Enables sub-100 nm resolution through two-photon absorption processes, overcoming optical diffraction barriers for ultra-high feature definition [18].
- Volumetric Additive Manufacturing (VAM): Projects sliced images into a synchronized rotating vat from multiple angles, allowing rapid (>50 cm/h) layerless fabrication and unique capability for overprinting around existing 3D structures [18].
The recent introduction of visible-light-driven aqueous polymerization represents a significant advancement for in vivo applications, as it eliminates the need for oxidants, metal catalysts, or organic solvents that limit biocompatibility and scalability [17]. This approach enables direct photopatterning of OMIECs on biological substrates, forming conformal interfaces for neural recording and other bioelectronic functions.
Performance Metrics of Photopolymerized Bioelectronic Devices
Table 1: Quantitative Performance of Photopolymerized Organic Mixed Ion-Electron Conductors
| Performance Parameter | Reported Value | Significance for Bioelectronics |
|---|---|---|
| Electrical Conductivity | State-of-the-art performance [17] | Ensures efficient signal transduction for recording and stimulation |
| Electrochemical Properties | Optimized for device function [17] | Enables stable operation in biological environments |
| Signal-to-Noise Ratio | Significantly enhanced in vivo [17] | Improves fidelity of neural and physiological recordings |
| Thickness Range | Ultra-thin, conformal films [17] | Promotes seamless biointegration and minimal tissue response |
| Fabrication Compatibility | Direct patterning on biological substrates [17] | Enables in situ formation of complex circuitry |
Table 2: Comparison of Photopolymerization Techniques for Bioelectronic Fabrication
| Technique | Resolution | Fabrication Speed | Key Advantages | Biological Compatibility |
|---|---|---|---|---|
| Digital Light Processing (DLP) | ∼1-100 μm [18] | Fast (layer-based) | High precision for architectural gradients [19] | Moderate (depends on resin) |
| Stereolithography (SLA) | <100 μm [19] | Moderate | Precise control over mechanical properties [19] | Moderate (depends on resin) |
| Multi-photon Lithography (MPL) | Sub-100 nm [18] | Slow | Unparalleled feature resolution [18] | Moderate (depends on resin) |
| Visible-Light Aqueous Polymerization | Micrometer scale [17] | Rapid | Excellent biocompatibility, in situ application [17] | High (water-based, initiator-free) |
| Volumetric Additive Manufacturing (VAM) | ∼100 μm [18] | Very fast (>50 cm/h) | Layerless fabrication, overprinting capability [18] | Moderate (depends on resin) |
Detailed Experimental Protocols
Protocol: In Vivo Photopolymerization of OMIECs on Biological Surfaces
Principle: This protocol describes the initiator-free, visible-light-induced polymerization of water-soluble conducting polymer precursors directly on biological substrates for forming biocompatible, high-performance OMIECs [17].
Materials:
- Water-soluble conducting polymer precursors (specific chemical identities not disclosed in source)
- Visible light source (wavelength optimized for polymerization)
- Biological substrate (e.g., mouse skin, neural tissue)
- Application apparatus for precursor solution
- Protective atmosphere (if required)
- Characterization equipment (electrical, electrochemical)
Procedure:
- Precursor Solution Preparation: Prepare aqueous solution of conducting polymer precursors at optimal concentration for film formation and electrical performance.
- Substrate Preparation: Gently clean biological substrate surface while maintaining tissue viability. Ensure surface is accessible for application and polymerization.
- Solution Application: Apply precursor solution uniformly to target area of biological substrate using controlled deposition technique.
- Photopolymerization: Expose coated substrate to visible light at specified intensity and duration to initiate polymerization. Optimize parameters to achieve complete conversion while preserving tissue integrity.
- Pattern Definition: Utilize photomasks or focused light for spatial control over conductor formation, creating defined circuit patterns.
- Post-Processing: Rinse gently with physiological buffer to remove unreacted precursors if necessary.
- Characterization: Validate electrical properties, adhesion, and biocompatibility through appropriate in vivo measurements.
Technical Notes:
- Light intensity and exposure time must be carefully balanced to achieve complete polymerization without tissue damage.
- Precursor concentration and solution viscosity affect final film thickness and conformality.
- The process enables manufacturing of OECTs directly on biological surfaces for neural recording and other bioelectronic applications [17].
Protocol: Fabrication of Gradient Scaffolds with Embedded Circuitry via Vat Photopolymerization
Principle: This protocol leverages vat photopolymerization to create continuous gradient scaffolds with compositional, architectural, and mechanical gradients that mimic native tissue organization while incorporating conductive elements [19].
Materials:
- Biocompatible photo-crosslinkable resins (e.g., GelMA-based formulations)
- Conductive additives (e.g., carbon nanomaterials, conductive polymers)
- Photoinitiators (e.g., LAP - lithium phenyl-2,4,6-trimethylbenzoylphosphinate)
- Vat photopolymerization printer (DLP or SLA configuration)
- CAD software for scaffold design
- Post-processing equipment (washing, curing)
- Characterization instruments (SEM, mechanical testing, electrical measurement)
Procedure:
- Resin Formulation: Prepare photoresin with controlled concentrations of conductive additives to establish conductivity gradients. Optimize viscosity and photoreactivity for printing.
- Gradient Design: Create digital models of gradient scaffolds using CAD software, incorporating pore size, geometry, and material distribution gradients to mimic native tissue architecture.
- Print Parameters: Set printing parameters (layer thickness, exposure time, light intensity) based on resin working curve characteristics.
- Printing Execution: Fabricate scaffolds layer-by-layer, varying material composition or exposure parameters to achieve desired gradients.
- Post-Processing: Carefully wash scaffolds to remove uncured resin, then perform final curing if required.
- Sterilization: Employ appropriate sterilization technique that preserves scaffold properties and conductivity.
- Characterization: Validate architectural features, mechanical properties, conductivity distribution, and biocompatibility.
Technical Notes:
- The integration of modeling tools like design of experiments (DoE) and AI-driven computational methods can optimize fabrication process and enhance scaffold designs [19].
- Compositional gradients can be achieved by controlled variation of conductive filler concentration during printing.
- Mechanical properties can be tailored through spatial control of crosslinking density via modulated light exposure.
Visualization of Workflows and Signaling Pathways
Diagram Title: In Vivo Photopolymerization Workflow
Diagram Title: Bioelectronic System Integration Pathway
The Scientist's Toolkit: Essential Research Reagents and Materials
Table 3: Essential Research Reagents for In Vivo Photopolymerization
| Reagent/Material | Function | Application Notes |
|---|---|---|
| Water-Soluble Conducting Polymer Precursors | Forms organic mixed ion-electron conductors (OMIECs) under light exposure [17] | Enables initiator-free visible-light polymerization; provides dual charge transport |
| Gelatin Methacrylate (GelMA) | Photopolymerizable biomaterial for tissue engineering scaffolds [20] | Provides hydrated 3D structure mimicking extracellular matrix; biocompatible and degradable |
| Lithium Phenyl-2,4,6-trimethylbenzoylphosphinate (LAP) | Photoinitiator for visible light polymerization [20] | Enables crosslinking under mild light conditions; suitable for cell-laden constructs |
| Desferrioxamine (DFO) | Iron-chelating agent that promotes angiogenesis [20] | Enhances vascularization of implanted constructs; can be loaded into hydrogels |
| Biocompatible Photo-Crosslinkable Resins | Base material for vat photopolymerization [19] [18] | Form functional 3D structures with controlled mechanical and chemical properties |
| Conductive Additives | Implements electrical functionality within polymer matrices | Includes carbon nanomaterials, metallic particles, or intrinsic conductive polymers |
| Demineralized Bone Matrix (DBM) | Provides osteoinductive scaffold material [20] | Source of collagen and growth factors; enhances bone repair in composite hydrogels |
Application Notes and Implementation Guidelines
Optimization Strategies for In Vivo Performance
Successful implementation of layered and 3D circuitry within the body requires careful optimization of multiple parameters:
Biocompatibility and Biointegration: The initiator-free, visible-light approach significantly enhances biocompatibility by eliminating toxic components traditionally used in conducting polymer synthesis [17]. For long-term implantation, materials should exhibit mechanical properties matching the target tissue to minimize foreign body response and promote seamless integration.
Electrical Performance Optimization: Achieving state-of-the-art electrical and electrochemical properties requires precise control over polymerization degree and molecular ordering. The photopolymerization process must be optimized to create continuous conductive pathways while maintaining the soft, flexible characteristics essential for biointerfacing.
Structural Complexity and Resolution: Vat photopolymerization techniques enable creation of compositional, architectural, and mechanical gradients within scaffolds [19]. For circuitry applications, this translates to spatially controlled conductivity and functionality. Resolution limits must be considered relative to the specific application requirements, with multi-photon lithography providing the highest feature definition for intricate neural interfaces.
Future Directions and Scaling Considerations
The field of in vivo photopolymerization for bioelectronics is rapidly evolving, with several promising directions emerging:
Closed-Loop Bioelectronic Systems: The integration of photopolymerized sensors and circuits with closed-loop neuromodulation systems represents a significant opportunity [21]. These systems can detect physiological signals and deliver precisely timed therapeutic stimulation, creating autonomous bioelectronic medicines.
Advanced Manufacturing Integration: Combining vat photopolymerization with other manufacturing techniques (e.g., direct ink writing) through overprinting capabilities enables complex multi-material devices [18]. This approach facilitates integration of soft conductive elements with structural components and drug delivery reservoirs.
Clinical Translation Pathway: Scaling from experimental models to clinical applications requires addressing sterilization, stability, and regulatory considerations. The demonstrated compatibility of photopolymerized OMIECs with in vivo applications provides a promising foundation for clinical translation [17].
Neurodegenerative diseases (NDs), such as Alzheimer's disease (AD) and Parkinson's disease (PD), are characterized by progressive neuronal dysfunction and cell death, leading to a severe loss of cognitive and motor functions. These disorders pose a significant global health burden, with current treatments largely focused on symptom management rather than halting or reversing disease progression [22] [23] [24]. The complexity of neural structures, coupled with the limited regenerative capacity of nerve cells—especially in the central nervous system (CNS)—presents a substantial challenge for treatment [22]. Furthermore, the blood-brain barrier (BBB) effectively blocks over 98% of drugs from entering the nervous system, significantly impeding therapeutic delivery [24].
In this context, advanced neural interfaces have emerged as promising tools for both monitoring and treating NDs. Traditional bioelectronics, often made from rigid materials, can cause inflammation, scarring, and mechanical mismatch with soft brain tissue, leading to complications and loss of function over time [4] [12]. The emerging field of in vivo photopolymerization addresses these limitations by enabling the formation of soft, biocompatible, and conductive structures directly within living tissue. This Application Note explores the application of this innovative technology within a broader thesis on bioelectronics research, providing detailed protocols for its use in developing next-generation neural interfaces for neurodegenerative diseases [4] [10].
In Vivo Photopolymerization: A Paradigm Shift for Bioelectronics
Core Concept and Rationale
In vivo photopolymerization is a refined method that uses light to create electrically conductive materials directly inside the body. This technique represents a significant advancement over traditional implanted electrodes, which require tissue to adapt to the device. The process involves the photopolymerization of novel photoactive monomers into soft, conductive structures that seamlessly integrate with native tissue, such as the brain [4].
The primary advantages of this approach are:
- Minimized Mechanical Mismatch: The formed structures are hydrogels with mechanical properties (Young's moduli in the kPa range) closely matching those of soft brain tissue (1–4 kPa), reducing shear-stress-induced tissue damage [12].
- Enhanced Biocompatibility: The materials are tissue-friendly, mitigating inflammatory responses and scarring [4].
- Spatial Control and Complexity: Using photolithography masks allows for the creation of specific, layered, and complex 3D electrode patterns directly in vivo, a level of precision previously unattainable with other in situ methods [10].
- Minimally Invasive Implantation and Natural Degradation: The process is minimally invasive, and the resulting bioelectrodes can degrade naturally after use, eliminating the need for surgical removal [4].
Key Photopolymerization Mechanisms
The photopolymerization of conductive polymers like the 3E monomers follows a Single Electron Transfer (SET) mechanism facilitated by a photocatalyst and light. This process consumes oxygen and produces hydrogen peroxide as a by-product [10]. The reaction kinetics are swift, with curing times ranging from 5 to 30 minutes, making it suitable for in vivo applications where time is a critical factor [4] [10].
Experimental Protocols for In Vivo Photopolymerization
This section provides a detailed methodology for creating patterned conductive structures within living animal models, specifically zebrafish and chicken embryos.
Protocol 1: Forming Conductive Patterns in Zebrafish
Objective: To create precisely defined, conductive polymer patterns within a living zebrafish model using photopolymerization.
Materials:
- Animals: Adult zebrafish (Danio rerio).
- Monomer Solution: 3E-series monomer (e.g., 3E-S, 3E-COONa, or 3E-PC) at a concentration of 0.4 mg/mL in an aqueous buffer [10].
- Photocatalyst: Rose Bengal (for green light) or SIR-COOH (for red light), typically at a 4% catalyst loading [10].
- Light Source: LED lamp with precise wavelength control (550 nm green light for Rose Bengal; 621 nm red light for SIR-COOH) and an intensity of 65 mW/cm² [10].
- Photolithography Mask: A custom mask with the desired 2D electrode pattern [10].
- Anesthesia: Tricaine methanesulfonate (MS-222) solution.
- Microinjection System: Fine glass capillary needles and a micromanipulator.
Procedure:
- Animal Preparation: Anesthetize the zebrafish by immersion in a MS-222 solution according to established animal care protocols.
- Solution Preparation: Prepare the monomer solution and mix with the selected photocatalyst thoroughly. Protect the solution from ambient light.
- Microinjection: Using a microinjection system, carefully inject a small, controlled volume (e.g., 1-5 µL) of the monomer-photocatalyst solution into the target tissue region in the zebrafish.
- Mask Alignment: Gently position the photolithography mask over the region of interest on the animal's body.
- Photopolymerization: Expose the masked area to the appropriate light wavelength for 5-15 minutes. Monitor the reaction; formation of a dark blue-green color indicates polymer formation [10].
- Post-Procedure Care: Remove the mask and return the zebrafish to fresh water for recovery. Monitor the animal for any signs of distress.
Key Parameters:
- Reaction Time: 5 minutes (with 4% Rose Bengal & green light) to 15 minutes (with SIR-COOH & red light) [10].
- Light Intensity: 65 mW/cm² [10].
- Monomer Concentration: 0.4 mg/mL is optimal; higher concentrations (e.g., 4 mg/mL) can reduce reaction efficiency due to light absorption [10].
Protocol 2: Multi-Layer Circuit Fabrication in Chicken Embryos
Objective: To fabricate multi-layered, complex 3D conductive circuits within a chicken embryo model.
Materials:
- Biological Model: Fertilized chicken (Gallus gallus) eggs, incubated to the desired developmental stage.
- Monomer System: A combination of 3E monomers and the PEDOT-S variant A5 [10].
- Photocatalyst: SIR-COOH.
- Light Source: Red light (621 nm).
- Masks: A set of different photolithography masks for defining successive layers.
Procedure:
- Embryo Access: Following standard embryological techniques, create a small window in the eggshell to access the embryo.
- First Layer Application: Inject the A5 monomer solution around the target tissue. A5 will self-assemble into a temporary conductive hydrogel matrix by absorbing ions from the tissue [10].
- First Layer Patterning: Inject the 3E monomer mixed with SIR-COOH into the A5 hydrogel region. Align the first photolithography mask and expose to red light for 15 minutes. The 3E monomers will polymerize within the A5 matrix only in the exposed regions, stabilizing and enhancing conductivity in the pattern of the mask [10].
- Second Layer Application: Carefully introduce a fresh mixture of A5 and the 3E/photocatalyst solution over the first patterned layer.
- Second Layer Patterning: Align a second mask with a different pattern and repeat the photopolymerization process with red light.
- Closure and Incubation: Seal the window in the eggshell and return the egg to the incubator for further development, if required by the experimental design.
Key Insight: This protocol leverages the temporary scaffolding provided by A5 and the precise patterning of 3Es to build layered circuits, demonstrating the potential for creating sophisticated 3D bioelectronic interfaces in vivo [10].
Table 1: Key Experimental Parameters for In Vivo Photopolymerization
| Parameter | Protocol 1 (Zebrafish) | Protocol 2 (Chicken Embryo) | Significance |
|---|---|---|---|
| Monomer | 3E-S / 3E-COONa / 3E-PC (0.4 mg/mL) | 3E Monomers + A5 PEDOT-S variant | 3E monomers have low oxidation potential for efficient polymerization; A5 provides a scaffold [10]. |
| Photocatalyst | Rose Bengal or SIR-COOH | SIR-COOH | Enables polymerization with tissue-penetrating green/red light [10]. |
| Light Wavelength | 550 nm (Green) or 621 nm (Red) | 621 nm (Red) | Longer wavelengths (red) offer better tissue penetration [10]. |
| Curing Time | 5 - 30 minutes | ~15 minutes per layer | Fast kinetics are crucial for viability in live models [4] [10]. |
| Spatial Control | 2D patterns via single mask | 3D layer-on-layer circuits via multiple masks | Enables creation of complex, multi-layered bioelectronic devices [10]. |
The Scientist's Toolkit: Essential Research Reagents and Materials
Successful implementation of in vivo photopolymerization requires a specific set of reagents and materials. The table below details these key components.
Table 2: Research Reagent Solutions for In Vivo Photopolymerization
| Item | Function / Role | Specification & Notes |
|---|---|---|
| 3E Monomers | Core photoactive building block | Includes 3E-S, 3E-COONa, 3E-PC. Characterized by low oxidation potential for efficient photopolymerization [10]. |
| A5 (PEDOT-S) | Conductive polymer variant | Forms nanoparticles that aggregate into a temporary ion-conducting hydrogel in vivo, acting as a scaffold for 3E patterning [10]. |
| Rose Bengal | Photocatalyst | Used for polymerization under green light (550 nm). Typical loading 4% for complete reaction within 5 minutes [10]. |
| SIR-COOH | Photocatalyst | A far-red fluorescent dye used for polymerization under red light (621 nm), offering deeper tissue penetration [10]. |
| PEDOT:PSS | Conductive polymer base | A high-performance conductive polymer (CP) used in many bioelectronics. Can be blended with additives to enhance conductivity and mechanical properties [12]. |
| Photolithography Masks | Defines electrode geometry | Custom masks are critical for achieving spatial control and creating detailed 2D and 3D conductive patterns [10]. |
Performance Data and Material Characterization
The performance of photopolymerized bioelectronics is benchmarked against traditional materials. The conductive structures formed in vivo exhibit properties suitable for neural interfacing.
Table 3: Performance Comparison of Bioelectronic Materials
| Material / Property | Conductivity | Young's Modulus | Biocompatibility & Integration | Key Advantage |
|---|---|---|---|---|
| Photopolymerized 3E/A5 | Conductive (specific values under characterization) | kPa range (matches brain tissue) | High; seamless integration with cells; degrades after use [4]. | Precise geometric control & minimal mechanical mismatch. |
| PEDOT:PSS (Pure) | < 1 S/cm [12] | 1-2 GPa [12] | Good, but substrate-bound. | High solution processability. |
| PEDOT:PSS (Enhanced) | > 1000 S/cm (with additives) [12] | 0.1 - 10 MPa (with additives) [12] | Good biocompatibility; flexible. | Tunable conductivity and mechanics. |
| Metals (e.g., Au, Pt) | ~10⁵ S/cm | ~100 GPa | Poor; significant inflammation and scarring [12]. | High intrinsic conductivity. |
Key Characterization Results:
- Reaction Completion: Confirmed via UV-Vis spectroscopy, showing a distinct broad peak around 600 nm indicative of polymer formation. A 4% catalyst loading is sufficient for near-complete monomer conversion within 5 minutes [10].
- Polymer Structure: MALDI MS analysis confirms the formation of dimers and trimers, with the specific structure influenced by the photocatalyst and light wavelength [10].
- Mechanical Properties: The resulting material is a soft, hydrated hydrogel, with mechanical modulus comparable to brain tissue (2–4 kPa), ensuring minimal mechanical mismatch [12].
Workflow and Signaling Pathways
The following diagrams illustrate the experimental workflow and the underlying chemical mechanism of the photopolymerization process.
Experimental Workflow for In Vivo Photopolymerization
Diagram 1: In Vivo Photopolymerization Workflow. This diagram outlines the key steps for creating patterned conductive hydrogels directly in living tissue, from preparation and injection to light exposure and final analysis.
Photopolymerization Chemical Mechanism
Diagram 2: Photopolymerization Chemical Mechanism. This diagram illustrates the Single Electron Transfer (SET) pathway. Light excites a photocatalyst, which then transfers an electron to oxygen, generating hydrogen peroxide that oxidizes the 3E monomers, leading to their polymerization into a conductive structure.
Integration with Drug Delivery Systems and Personalized Therapies
The convergence of in vivo photopolymerization with advanced drug delivery systems represents a paradigm shift in bioelectronics research, enabling the creation of conformable, biologically integrated devices for personalized therapeutic interventions. This approach facilitates the in-situ formation of conductive polymers and biocompatible interfaces directly on or within biological tissues, allowing for seamless integration of sensing and drug delivery capabilities [17]. Unlike pre-fabricated rigid implants, these photopolymerized systems bridge the mechanical mismatch with biological tissues, minimizing foreign body response and improving long-term stability while enabling precise spatiotemporal control over therapeutic agent release [1] [25].
The fundamental operating principle combines bioelectronic sensing with controlled drug release in closed-loop systems that respond to physiological cues. These systems typically consist of a monitoring component that senses surrounding conditions and an actuator component that triggers drug release when specific biomarkers exceed predetermined thresholds [26]. This architecture allows for therapeutic interventions that are precisely timed and dosed according to individual patient needs, moving beyond one-size-fits-all treatment approaches toward truly personalized medicine.
Table 1: Core Advantages of Photopolymerized Bioelectronic Drug Delivery Systems
| Feature | Traditional Systems | Photopolymerized Systems | Clinical Impact |
|---|---|---|---|
| Biocompatibility | Moderate to low (rigid materials) | High (soft, conformable materials) | Reduced inflammation and fibrosis [1] |
| Integration Method | Surgical implantation | In situ photopolymerization | Minimally invasive placement [17] |
| Customization | Pre-defined geometries | Patient-specific patterning via photomasks | Perfect anatomical conformity [1] |
| Drug Release Profile | Passive diffusion | Active, responsive release | Personalized dosing regimens [26] |
| Curing Time | N/A (pre-fabricated) | 5-30 minutes | Rapid procedural times [1] |
Key Experimental Protocols
In Vivo Photopolymerization of Conductive Patterns
This protocol enables the direct formation of detailed conducting patterns on biological substrates, including skin and other tissues, for integrated drug delivery applications [1].
Materials Required:
- Novel photoactive monomers (3Es - EDOT-trimers)
- Poly(3,4-ethylenedioxythiophene)butoxy-1-sulfonate (PEDOT-S) derivative A5
- Photolithography masks (custom-designed for target anatomy)
- Light source (green/red light, wavelength-specific)
- Biocompatible photoinitiator (if required by specific monomer system)
Procedure:
- Substrate Preparation: For external applications, clean the biological substrate (e.g., skin) with successive sonication in 2-propanol and acetone baths (20 min each) if applicable. For internal applications, ensure surgical field is properly prepared and stabilized [27].
- Monomer Application: Apply the photoactive monomer solution (3Es alone or in mixture with A5) directly to the target tissue surface in a uniform layer.
- Mask Alignment: Carefully position photolithography masks defining the desired electrode patterns directly over the monomer-coated area.
- Photopolymerization: Expose the masked region to visible light (green or red spectrum) at optimized intensity for 5-30 minutes, depending on the specific monomer formulation and light wavelength [1].
- Pattern Development: Remove the photomask following exposure, leaving behind the polymerized conductive pattern bonded to the biological substrate.
- Quality Verification: Confirm conductivity and pattern fidelity using appropriate measurement techniques.
Technical Notes:
- Green and red lights are preferred for in vivo applications due to superior tissue penetration and reduced phototoxicity compared to UV light [1].
- Curing times vary based on light intensity, wavelength, and monomer composition—optimize for each specific application.
- Resulting conductive structures enable both biosensing and controlled drug release capabilities when integrated with appropriate formulations.
Fabrication of Wearable Bioelectronic Drug Delivery System
This protocol describes the creation of a modular, wearable platform for controlled ionic and molecular delivery, adaptable for various therapeutic applications including wound healing [28].
Materials Required:
- Polydimethylsiloxane (PDMS) base and curing agent
- Customizable 3D-printed molds (resin-based)
- Low-alloy steel contact posts (1.6 mm diameter, 4.8 mm length)
- Platinum (Pt) wires or silver/silver chloride (Ag/AgCl) electrodes
- Hydrogel-forming materials (e.g., polyvinyl alcohol for capillaries)
- Printed circuit board (PCB) with microcontroller unit
- Parylene coating system
Procedure:
- Mold Fabrication: Design and 3D-print two-part molds using resin printers. Sonicate molds in isopropyl alcohol (IPA), wash with water, dry with N₂ gas, and UV cure.
- PDMS Casting: Mix PDMS base and curing agent, degass under vacuum, and pour into molds. Cure for 48 hours in a 60°C oven.
- Device Assembly:
- Demold top and bottom PDMS pieces by running a sharp blade along mold edges.
- Insert electrodes into top PDMS piece so one wire end exposes to reservoir and the other to a through-hole.
- Apply a drop of PDMS at electrode insertion points to prevent leakage and allow to cure.
- Surface Activation & Bonding: Position PDMS pieces in custom aluminum clamps and place in O₂ chamber to activate surfaces. Close clamps with screws/bolts to ensure mechanical contact and alignment.
- Parylene Coating: Apply parylene coating with thickness of 2.561 μm to mitigate substance leakage and bubble formation in reservoirs.
- Electrical Interfacing: Insert low-alloy steel contact posts into PDMS through-holes. Coat posts with silver epoxy to create electrical bridge from embedded electrodes to PCB.
- Hydrogel Filling: Fill capillary tubes with selected hydrogel and insert into designated sites in PDMS device.
- System Integration: Mechanically and electrically connect PDMS device to PCB through contact posts.
- Reservoir Loading: Fill PDMS reservoirs with therapeutic solutions (e.g., H⁺ for pH control, fluoxetine for wound healing) via syringe injection.
Technical Notes:
- The platform provides four independent actuation channels for multiplexed drug delivery [28].
- Reservoir solutions and electrode materials can be customized based on specific therapeutic requirements.
- The system can operate in wired or battery-powered modes with programmable voltage application.
Performance Data and Applications
Photopolymerized bioelectronic systems demonstrate enhanced performance characteristics crucial for effective drug delivery applications. The created organic mixed ion-electron conductors (OMIECs) exhibit state-of-the-art electrical, electrochemical, and device properties along with exceptional biocompatibility and conformability with various flexible and biological surfaces [17].
Table 2: Quantitative Performance Metrics of Photopolymerized Bioelectronic Systems
| Parameter | Performance Value | Significance for Drug Delivery |
|---|---|---|
| Curing Time | 5-30 minutes | Enables rapid device fabrication during medical procedures [1] |
| Conductivity Range | Compatible with neural recording | Facilitates biosensing for closed-loop drug release [17] |
| Signal-to-Noise Ratio | Significantly enhanced | Improves detection sensitivity for biomarker monitoring [17] |
| Biocompatibility | High (demonstrated on mouse skin in vivo) | Enables direct tissue integration without excessive immune response [17] [1] |
| Pattern Resolution | Detailed conductive patterns via photomasks | Allows creation of complex, multi-functional drug release arrays [1] |
| Mechanical Properties | Soft, flexible, conformable | Maintains integrity on dynamic biological tissues [25] |
Experimental demonstrations have validated the therapeutic potential of these systems. Photopolymerized electrodes manufactured directly on mouse skin in vivo significantly enhanced the recording efficacy and signal-to-noise ratio of low-frequency brain activity in anesthetized mice [17]. In wound healing applications, bioelectronic delivery of H⁺ in mouse models showed an improvement of 35.86% in the M1/M2 macrophage ratio compared with control wounds, indicating accelerated healing processes [28].
The Scientist's Toolkit: Essential Research Reagents and Materials
Table 3: Key Research Reagents and Materials for Photopolymerized Drug Delivery Systems
| Material/Reagent | Function | Application Notes |
|---|---|---|
| 3Es (EDOT-trimers) | Photoactive monomers | Form conductive structures when polymerized with light; enable spatial control of electrode patterns [1] |
| PEDOT-S derivative A5 | Conductive polymer base | Provides mixed ion-electron conductivity; enhances biocompatibility [1] |
| Polyvinyl Alcohol (PVA) | Hydrogel matrix for capillaries | Facilitates ion transport; interfaces with wound beds [28] |
| Polydimethylsiloxane (PDMS) | Device body material | Biocompatible encapsulation; customizable form factor [28] |
| Photolithography Masks | Pattern definition | Create specific electrode geometries; enable complex circuit designs [1] |
| Visible Light Source (Green/Red) | Polymerization initiation | Enables in vivo curing; superior tissue penetration vs. UV [1] |
| Parylene | Conformal coating | Prevents leakage and bubble formation in reservoirs; enhances biostability [28] |
| Silver Epoxy | Electrical connection | Bridges electrodes to circuitry; maintains conductivity in biological environments [28] |
System Workflow and Signaling Pathways
The following diagram illustrates the complete operational workflow of an integrated photopolymerized bioelectronic system for drug delivery, from device fabrication through therapeutic action:
Workflow Description: The process begins with substrate preparation where target biological tissue is cleaned and prepared. Photoactive monomers are applied and patterned using visible light through photomasks, creating conductive structures directly on the tissue [1]. These conductive patterns continuously monitor relevant biomarkers, with processed data determining whether drug release thresholds are exceeded. When triggered, controlled drug release occurs, creating a closed-loop system that continuously monitors therapeutic outcomes and adjusts delivery parameters accordingly [26]. This entire workflow exemplifies the personalized nature of photopolymerized bioelectronic systems, enabling patient-specific treatment regimens that respond dynamically to changing physiological conditions.
The integration of photopolymerization technologies with bioelectronic drug delivery systems represents a significant advancement in personalized medicine, offering unprecedented capabilities for creating patient-specific therapeutic devices that seamlessly interface with biological tissues while providing precise, responsive control over drug release profiles.
Overcoming Technical Hurdles: Kinetics, Oxygen Inhibition, and Resolution
The development of in vivo bioelectronics represents a frontier in therapeutic sciences, offering potential treatments for neurological disorders and cardiac conditions. A significant challenge in this field is the implantation of conductive structures within the body, which often leads to inflammation and scarring when using traditional rigid, substrate-bound electrodes. In vivo photopolymerization has emerged as a transformative approach that enables the direct formation of biocompatible conductive polymers within living tissue. This technique addresses the biomechanical mismatch between conventional electronics and soft biological tissues while providing unprecedented spatial control over electrode geometry [10].
The optimization of curing parameters—light intensity, exposure time, and wavelength—is critical for achieving successful polymerization outcomes in the complex in vivo environment. These parameters directly influence reaction kinetics, polymerization efficiency, and ultimately, the biocompatibility and functionality of the resulting conductive structures. This application note provides a comprehensive framework for optimizing these essential parameters, supported by experimental data and detailed protocols tailored for bioelectronics research [10] [29].
Fundamental Principles of In Vivo Photopolymerization
Photopolymerization is an irreversible transformation of liquid polymerizable formulations into stable solids triggered by light exposure. For in vivo applications, this process offers distinct advantages including high temporal and spatial control, rapid curing times, and the ability to create complex structures directly within biological environments [30]. The mechanism involves a photoinitiator absorbing light energy and generating radical species that initiate polymerization of monomer units into conductive polymers [30].
Unlike conventional manufacturing settings, in vivo photopolymerization presents unique challenges including light scattering and absorption by biological tissues, stringent biocompatibility requirements, and the need for operation at physiological temperatures. Successful implementation requires careful balancing of curing parameters to achieve sufficient polymerization while maintaining tissue viability [10].
Table 1: Comparison of Photopolymerization Mechanisms
| Polymerization Type | Mechanism | Oxygen Sensitivity | Dark Curing | Common Monomers |
|---|---|---|---|---|
| Free-Radical | Radical initiation and propagation | High inhibition | Negligible | Acrylates, PCLTA |
| Cationic | Acid-induced cationic initiation | Low inhibition | Significant | Epoxides, Vinyl Ethers |
| Oxidative (for Conductive Polymers) | Single-electron transfer mechanism | Consumes oxygen | Not observed | EDOT derivatives, 3E monomers |
Critical Curing Parameters and Their Optimization
Light Intensity
Light intensity directly influences the initial radical concentration and polymerization rate. Higher intensities generate more initiating radicals, leading to faster polymerization onset and higher conversion rates. However, excessive intensity can cause premature gelation and heat generation potentially damaging to surrounding tissues [29] [8].
Research using polycaprolactone triacrylate (PCLTA) scaffolds demonstrates that intensity directly affects mechanical properties, with higher intensities (0.5-5.0 W/cm²) producing stiffer materials with higher shear modulus values [8]. For in vivo applications using conductive polymers, optimized intensities must balance complete monomer conversion with tissue compatibility.
Exposure Time
Exposure duration determines the total energy dose delivered to the photopolymerizing system. Sufficient time is necessary for achieving high conversion, but excessive exposure can lead to overcuring and potential light-induced tissue damage [10] [8].
Studies on PCLTA photopolymerization reveal that minimum polymerization times decrease with increasing intensity—from 360 seconds at 0.5 W/cm² to 125 seconds at 5.0 W/cm² [8]. For in vivo formation of conductive polymers using EDOT-trimers, exposure times of 5-30 minutes have proven effective, significantly shorter than enzymatic polymerization methods requiring hours to days [10].
Wavelength Selection
Wavelength selection is critical for both penetration depth and biocompatibility. Longer wavelengths (green/red light) penetrate tissue more effectively but require appropriate photoinitiators with matching absorption characteristics [10].
The use of green light (550 nm) with Rose Bengal photocatalyst and red light (621 nm) with SIR-COOH enables effective in vivo polymerization while minimizing tissue damage associated with UV light [10]. Matching the photoinitiator absorption characteristics to the output spectrum of the light source is essential for efficient polymerization.
Table 2: Optimized Curing Parameters for Various Applications
| Application | Intensity Range | Exposure Time | Wavelength | Key Monomers/Polymers |
|---|---|---|---|---|
| In Vivo Conductive Patterns [10] | 65 mW/cm² (green light) | 5-30 minutes | 550 nm (green), 621 nm (red) | 3E monomers, PEDOT-S derivative A5 |
| PCLTA Scaffold Fabrication [8] | 0.5-5.0 W/cm² | 125-360 seconds | 320-500 nm (UV-vis) | PCLTA, Irgacure 2959 |
| General Photopolymerization [29] | Varies by system | Seconds to minutes | UV to visible | Acrylates, Epoxides |
Experimental Protocols
Protocol for In Vivo Conductive Polymer Formation
This protocol details the formation of detailed conducting patterns within biological systems using photopolymerization, adapted from established methodologies [10].
Materials Required
- Monomer Solution: 3E derivatives (3E-S, 3E-COONa, or 3E-PC) at 0.4-4 mg/mL concentration
- Photocatalyst: Rose Bengal for green light (4% catalyst loading) or SIR-COOH for red light applications
- Light Source: LED array with precise wavelength control (550 nm or 621 nm)
- Photomask: Custom photolithography mask with desired electrode pattern
- Biological Model: Zebrafish (Danio rerio) or chicken embryos (Gallus gallus)
Procedure
- Monomer Preparation: Dissolve 3E monomer in physiological buffer to achieve 0.4 mg/mL concentration. For thicker structures, increase concentration to 4 mg/mL while ensuring adequate light penetration.
- Catalyst Addition: Add photocatalyst (4% by weight for Rose Bengal) to the monomer solution and mix thoroughly.
- Injection: Administer the monomer-catalyst solution to the target tissue site using microinjection techniques.
- Mask Alignment: Position the photomask to define the conductive pattern geometry.
- Photopolymerization: Expose to green light (550 nm, 65 mW/cm²) for 5 minutes or red light (621 nm) for 15 minutes.
- Validation: Confirm polymerization by visual inspection (dark blue-green color formation) and electrical conductivity testing.
Protocol for Parameter Optimization Studies
This protocol provides a systematic approach for evaluating curing parameters using rheological characterization [8].
Materials Required
- Polymer Formulation: Monomer/prepolymer with photoinitiator (e.g., PCLTA with 1% Irgacure 2959)
- Rheometer: Equipped with UV light source (320-500 nm filter)
- Light Source: Calibrated UV light with adjustable intensity (0.5-5.0 W/cm²)
- Testing Molds: Standardized molds for consistent sample geometry
Procedure
- Sample Preparation: Load 5 μL of polymer solution between rheometer plates with 0.05 mm gap height.
- Initial Measurement: Record baseline shear storage modulus (G′) and loss modulus (G″) at 0.1% strain and 1 Hz frequency.
- Controlled Irradiation: Expose samples to varying light intensities (0.5-5.0 W/cm²) for predetermined durations.
- Real-time Monitoring: Continuously monitor shear modulus throughout polymerization.
- Data Analysis:
- Determine crossover time (tₑ) when G′ diverges from G″
- Calculate maximum slope of shear modulus (dG′/dt) as cross-linking rate proxy
- Record plateau modulus (G′∞) as indicator of final mechanical properties
- Parameter Optimization: Correlate processing parameters with mechanical outcomes to identify optimal conditions.
Figure 1: Parameter Optimization Workflow - Systematic approach for establishing optimal curing conditions through iterative testing and characterization.
The Scientist's Toolkit: Essential Research Reagents
Table 3: Key Reagents for In Vivo Photopolymerization Research
| Reagent Category | Specific Examples | Function | Application Notes |
|---|---|---|---|
| Photoinitiators | Irgacure 2959, Camphorquinone (CQ) | Generates radicals upon light exposure to initiate polymerization | Irgacure 2959 offers good cytocompatibility; CQ is suitable for blue light applications [30] [8] |
| Conductive Monomers | 3E-S, 3E-COONa, 3E-PC | Forms the backbone of conductive polymer structures | EDOT-trimers with lower oxidation potential enable efficient photopolymerization [10] |
| Photocatalysts | Rose Bengal, SIR-COOH | Enables polymerization at longer wavelengths for deeper tissue penetration | Rose Bengal for green light (550 nm); SIR-COOH for red light (621 nm) [10] |
| Biocompatible Polymers | PCLTA, PEDOT-S derivative A5 | Provides structural support and temporary conductive hydrogel matrix | A5 forms nanoparticles that aggregate into conductive hydrogel in vivo [10] [8] |
| Light Absorbers | Custom light absorbers | Controls light penetration depth and improves resolution | Particularly important for achieving fine features in DLP-based printing [31] |
Advanced Considerations for Bioelectronics Applications
Spatial Control and Pattern Fidelity
Achieving high-fidelity patterns in vivo requires addressing light diffraction and scattering effects in biological tissues. Computational approaches using convolution-based gradient descent optimization algorithms can compensate for these effects by adjusting pixel grayscale in projected mask images [31]. These algorithms simultaneously consider accuracy in X, Y, and Z dimensions to ensure cured structures match design specifications.
For complex 3D electrode architectures, multilayer solidification models can predict printing outcomes by modeling exposure dose distribution throughout the volume. This approach enables pre-compensation for optical distortions before in vivo implementation [31].
Biocompatibility and Cytocompatibility
Photoinitiator cytotoxicity remains a significant concern for in vivo applications. Hydrophilic initiators like Irgacure 2959 generally demonstrate better cytocompatibility than hydrophobic alternatives due to reduced cellular membrane permeability [30]. Different cell types show variable sensitivity, with human fetal osteoblasts being particularly sensitive compared to mesenchymal stem cells [30].
Monomer selection also impacts biocompatibility. 3E monomers exhibit favorable cell viability profiles similar to established ETE derivatives, making them suitable for in vivo applications [10]. Thorough cytotoxicity assessment using relevant cell lines is essential before proceeding to in vivo studies.
Figure 2: In Vivo Photopolymerization Pathway - Sequential process from light exposure to functional bioelectronic device formation.
Optimizing curing parameters for in vivo photopolymerization requires careful consideration of the complex interplay between light intensity, exposure time, and wavelength. The protocols and data presented herein provide a foundation for developing customized photopolymerization conditions specific to bioelectronics applications. As this field advances, further refinement of these parameters will enable increasingly sophisticated interfaces between electronic and biological systems, opening new possibilities for therapeutic interventions and diagnostic capabilities.
The future of in vivo photopolymerization lies in developing smarter light-based fabrication strategies that can adapt to the dynamic biological environment while maintaining precise control over electrode geometry and functionality. By systematically applying the principles outlined in this application note, researchers can accelerate the development of next-generation bioelectronic devices optimized for clinical translation.
Strategies to Mitigate Oxygen Inhibition in Physiological Environments
In vivo photopolymerization represents a transformative approach for fabricating bioelectronic devices directly within living tissue, enabling seamless integration for neurological and physiological applications [4]. This technique utilizes light to initiate polymerization of conductive materials, forming soft, biocompatible hydrogels that interface with biological systems [17]. However, a significant challenge impedes its widespread adoption: oxygen inhibition. Molecular oxygen, ever-present in physiological environments, acts as a potent free radical scavenger that quashes polymerization initiation and propagation. This inhibition results in incomplete curing, compromised conductivity, and reduced biostability of implanted bioelectronic constructs [17] [4]. This Application Note details targeted strategies and standardized protocols to overcome oxygen inhibition, thereby enabling robust in situ formation of high-performance bioelectronics.
Quantitative Analysis of Oxygen Inhibition and Mitigation Efficacy
The tables below summarize key performance metrics and material properties critical for developing effective oxygen-mitigating strategies in physiological environments.
Table 1: Performance Metrics of Photopolymerized Conductive Hydrogels
| Material System | Conductivity (S/cm) | Polymerization Time (min) | Cytocompatibility | Key Advantage |
|---|---|---|---|---|
| PEDOT:AlgS [11] | ~20x improvement over baseline | 5-30 | High | Enhanced aqueous dispersibility |
| In Vivo Photopolymerized Hydrogels [4] | Suitable for neural recording | 5-30 (light-dependent) | High | Direct formation in tissue |
| OMIECs via Visible-Light [17] | State-of-the-art for OECTs | Not specified | High | Initiator-free polymerization |
Table 2: Oxygen Scavenging Systems and Their Efficacy
| Scavenging Strategy | Mechanism of Action | Reaction Byproducts | Suitable Environments |
|---|---|---|---|
| Enzymatic Scavengers (e.g., Glucose Oxidase) | Consumes O₂ to produce H₂O₂ and gluconic acid | Potential reactive oxygen species | Injectable hydrogels, deep tissue |
| Chemical Scavengers (e.g., Sulfites) | Reduces O₂ to sulfates | Inorganic salts | Pre-polymerization solutions |
| Physical Barriers (e.g., Lipid Coatings) | Creates diffusion barrier to O₂ ingress | None | Surface coatings, thin films |
Experimental Protocols
Protocol: Oxygen-Scavenging Hydrogel Formulation for In Vivo Photopolymerization
This protocol details the preparation of a conductive hydrogel ink incorporating an oxygen scavenging system to mitigate polymerization inhibition.
Materials:
- Monomer solution: 3,4-ethylenedioxythiophene (EDOT) or water-soluble conducting polymer precursors [17]
- Hydrophilic dopant: Sulfonated Alginate (AlgS) [11]
- Photoinitiator: Irgacure 2959 or LAP (Lithium phenyl-2,4,6-trimethylbenzoylphosphinate)
- Oxygen scavenger: Sodium sulfite or glucose oxidase/catalase system
- Phosphate Buffered Saline (PBS), pH 7.4
- Biocompatible crosslinker (e.g., PEG-DA)
Procedure:
- Synthesis of Sulfonated Alginate Dopant (AlgS):
- Dissolve alginate (~200 kDa) in dimethylformamide (DMF) at a concentration of 2% w/v.
- Add chlorosulfonic acid (CSA) dropwise to a final concentration of 2% w/v under continuous stirring at 4°C.
- React for 6 hours, then precipitate the product in ice-cold ethanol.
- Wash the pellet three times with ethanol and lyophilize to obtain AlgS powder [11].
Preparation of PEDOT:AlgS Conductive Ink:
- Dissolve the synthesized AlgS in deionized water at 2% w/v.
- Add EDOT monomer to the AlgS solution at a molar ratio of 1:2 (EDOT to sulfonate groups).
- Initiate oxidative polymerization by adding ammonium persulfate (APS) as an oxidant.
- Stir the reaction for 48 hours at room temperature, then dialyze against DI water for 3 days to remove unreacted species [11].
Formulation of Final Photopolymerizable Ink:
- Combine the PEDOT:AlgS dispersion with the photoinitiator (1-2 mM final concentration) and oxygen scavenger (10-20 mM for sodium sulfite).
- Adjust the viscosity if necessary using thixotropic agents like hyaluronic acid for injectability.
- Filter-sterilize the final ink through a 0.22 µm membrane for in vivo applications.
Protocol: In Vivo Photopolymerization and Characterization
Materials:
- Prepared oxygen-scavenging hydrogel ink
- Animal model (e.g., mouse or zebrafish)
- Fiber optic light source (wavelengths: blue ~465 nm, green ~520 nm, red ~650 nm) [4]
- Stereotaxic frame for precise positioning (for brain applications)
- Potentiostat for electrochemical characterization
- Histology equipment for biocompatibility assessment
Procedure:
- Administration and Illumination:
- Inject the formulated ink into the target tissue (e.g., subdermally or intracranially) using a 26-30G needle.
- Immediately illuminate the injection site using the fiber optic light source. For mouse skin, a light intensity of 50-100 mW/cm² for 5-30 minutes is effective, depending on tissue depth and light wavelength [4].
- Validation of Polymerization:
- Electrical Characterization: Use a two-point probe method or an OECT setup to measure the conductivity of the formed hydrogel in situ [17] [11].
- Mechanical Integration: Gently probe the polymerized area to assess adhesion and conformity to the surrounding tissue.
- Biocompatibility Assessment: After the experimental endpoint, explant the tissue and process for histology (H&E staining) to evaluate the immune response and integration at the material-tissue interface [4].
Signaling Pathways and Experimental Workflows
Diagram 1: Oxygen Inhibition in Photopolymerization (76 chars)
Diagram 2: In Vivo Polymerization Workflow (76 chars)
The Scientist's Toolkit: Research Reagent Solutions
Table 3: Essential Materials for Mitigating Oxygen Inhibition
| Reagent/Material | Function | Example Use Case |
|---|---|---|
| Sulfonated Alginate (AlgS) [11] | Hydrophilic dopant for PEDOT; enhances aqueous dispersibility and conductivity. | Creating injectable, high-conductivity PEDOT:AlgS hydrogels for bioelectronics. |
| Visible-Light Photoinitiators (LAP) [17] | Initiates polymerization under tissue-penetrating, biocompatible wavelengths. | In vivo photopolymerization for forming OMIECs directly on neural tissue. |
| Sodium Sulfite | Chemical oxygen scavenger; consumes dissolved O₂ in pre-polymer solutions. | Pre-treatment of hydrogel inks to reduce initial oxygen concentration before injection. |
| Glucose Oxidase/Catalase System | Enzymatic oxygen scavenging system; converts glucose and O₂ to gluconate and H₂O. | Maintaining low oxygen environments in cell-laden hydrogels during prolonged curing. |
| PEDOT:PSS [11] | Benchmark conductive polymer; requires modification for optimal in vivo use. | Control material for comparing performance of new oxygen-resistant formulations. |
Multi-Component Photoinitiating Systems for Enhanced Efficacy
The development of advanced bioelectronic interfaces that seamlessly integrate with biological tissues represents a frontier in medical science. A significant challenge in this field is the mechanical and chemical mismatch between conventional rigid electronic implants and soft, dynamic biological tissues, often leading to complications such as inflammation, scarring, and device failure. [32] [4] In vivo photopolymerization has emerged as a transformative approach for creating conductive, tissue-friendly materials directly within the body. This process uses light to convert liquid biochemical formulations into solid hydrogels or conductive polymers at the target site, offering minimal invasiveness and superior integration. [4]
The critical component enabling this technology is the photoinitiating system (PIS). Multi-component photoinitiating systems are particularly powerful as they can be engineered for enhanced efficacy, greater biocompatibility, and operation under biologically benign conditions (e.g., using visible light and low intensities). [33] These systems are designed to overcome the limitations of single-component initiators, such as cytotoxicity, limited penetration depth, and slow reaction rates. This document provides detailed application notes and experimental protocols for leveraging multi-component PIS to advance bioelectronics research, with a specific focus on in vivo applications.
Core Components and Mechanisms
A multi-component photoinitiating system typically consists of a light-absorbing photosensitizer (PS) and one or more co-initiators that interact upon light exposure to generate the active species that start the polymerization reaction. [33]
- Type II Photoinitiating Systems: The most common multi-component system involves a mechanism where the excited photosensitizer interacts with a co-initiator (often an amine, denoted as
Co-I) via an electron/proton transfer process, leading to the formation of free radicals that initiate polymerization. [33] [34] - Dye-Based Systems: Organic dyes like squaraines, BODIPYs, and pyrrole derivatives are increasingly popular as photosensitizers due to their high molar absorptivity in the visible light range and tunable biocompatibility. [33] This allows the use of longer, tissue-penetrating wavelengths and avoids the potentially damaging UV light required by many traditional photoinitiators.
Table 1: Key Components of a Multi-Component Photoinitiating System for In Vivo Applications
| Component | Role | Examples | Key Considerations for In Vivo Use |
|---|---|---|---|
| Photosensitizer (PS) | Absorbs light energy and enters an excited state. | BODIPYs, Squaraines, Pyrrole derivatives, Eosin Y, Rose Bengal. [33] | – High absorption in the visible spectrum.- Good water solubility.- Biocompatibility and low cytotoxicity. [33] [34] |
| Co-initiator (Co-I) | Reacts with the excited PS to generate the initiating radical. | Aliphatic amines (e.g., MDEA), silanes, and germanium-based compounds. [33] [34] | – Reduces oxygen inhibition.- Should be non-toxic at working concentrations.- Germanium-based initiators (e.g., Ivocerin) are emerging as less toxic alternatives. [34] |
| Monomer/ Oligomer | The building blocks that form the polymer network. | Acrylates, methacrylates, and hydrophilic macromers for hydrogels. [35] [4] | – Biocompatibility is paramount.- Final polymer should have tissue-like mechanical properties (softness, stretchability). [4] [36] |
The following diagram illustrates the electron transfer mechanism in a typical two-component Type II system, which is foundational for understanding the protocols that follow.
Quantitative Performance Data
Selecting the right PIS requires careful consideration of its performance metrics. The following table summarizes key data for representative systems, which can be used as a benchmark for formulation development.
Table 2: Performance Metrics of Selected Photoinitiating Systems
| Photoinitiating System | Light Conditions | Polymerization Rate / Efficiency | Critical Parameters & Outcomes | Primary Application Context |
|---|---|---|---|---|
| BAPO (Type I) [35] | 380 mW/cm² (UV LED), continuous | Peak polymerization rate at 3 mm depth achieved within 2.5 s with 0.1 wt% BAPO. | Low concentration (0.1-0.5 wt%) crucial for deep cure (>3 mm) with short irradiation (1-3.7 s). Flexural strength of cured polymer: 108 MPa. | Large-format additive manufacturing; protocols adaptable for thick implant coatings. |
| BODIPY-based (Type II) [33] | Visible light (e.g., blue, green), low intensity | High-performance initiation under mild conditions (room temperature, visible light). | Dye-based systems offer tunable absorption and reduced cytotoxicity compared to some synthetic PIs. | Promising for in vivo applications where visible light and biocompatibility are required. |
| In Vivo Photopolymerization [4] | Blue/Green/Red light, 5-30 min exposure | Formation of soft, conductive hydrogels directly in tissue (zebrafish, chicken embryos). | Biocompatible, degradable, and mechanically matched to soft tissues. Minimally invasive implantation. | Direct formation of bioelectronic interfaces (e.g., for neural signal regulation) in living tissue. |
Experimental Protocols
Protocol: Formulating a Biocompatible Photoinitiating System for Hydrogels
This protocol details the preparation of a visible-light-activated PIS suitable for creating conductive hydrogels for bioelectronics. [33] [4] [36]
Research Reagent Solutions:
- Photosensitizer Stock Solution: Eosin Y (1 mM) in deionized water.
- Co-initiator Stock Solution: N-Methyldiethanolamine (MDEA, 0.5 M) in deionized water.
- Monomer Solution: 20% (w/v) Poly(ethylene glycol) diacrylate (PEGDA, Mn = 700) in phosphate-buffered saline (PBS).
- Conductive Additive: 1% (w/v) PEDOT:PSS dispersion in water.
Procedure:
- Solution Preparation:
- In a sterile vial, mix 1 mL of the Monomer Solution (PEGDA) with 20 µL of the Conductive Additive (PEDOT:PSS). Gently vortex to mix without introducing air bubbles.
- Add 50 µL of the Co-initiator Stock Solution (MDEA) to the monomer mixture. Vortex again.
- Finally, add 100 µL of the Photosensitizer Stock Solution (Eosin Y). Protect the vial from light by wrapping it in aluminum foil. Mix thoroughly until a homogeneous, slightly colored solution is obtained.
- Note: All steps should be performed under aseptic conditions if the end product is for implantation.
Photopolymerization:
- Transfer a small volume (e.g., 50-100 µL) of the final formulation to a mold or directly onto the target substrate (e.g., a tissue-mimicking gel).
- Irradiate the sample using a visible light source (e.g., a blue LED lamp, λ = 470 nm, intensity = 10-50 mW/cm²) for 60-300 seconds, depending on the desired thickness and crosslinking density.
- Monitor the reaction; a visible color change and solidification indicate successful gel formation.
Post-Processing and Validation:
- The resulting hydrogel should be rinsed with PBS to remove any unreacted components.
- Characterize the hydrogel's properties:
- Electrical Conductivity: Measure using a four-point probe system.
- Mechanical Properties: Perform tensile or compression tests to determine the Young's modulus and ensure it matches the target tissue (e.g., ~10-15 kPa for brain tissue). [32]
- Swelling Ratio: Measure the mass change in PBS over 24 hours to assess network stability.
Protocol: Optimizing Cure Depth for Thick Sections
This protocol is adapted from large-format additive manufacturing and is highly relevant for creating robust, thick bioelectronic implants or encapsulation layers. [35]
Research Reagent Solutions:
- Photoinitiator: Bis(2,4,6-trimethylbenzoyl)-phenylphosphine oxide (BAPO), a photobleaching Type I PI.
- Monomer Base: A 70:30 mixture of a difunctional acrylate (e.g., Bis-EMA) and a monofunctional diluent (e.g., isobornyl acrylate) to control viscosity and crosslink density.
Procedure:
- Formulation Screening:
- Prepare a series of formulations with varying BAPO concentrations: 0.1 wt%, 0.25 wt%, 0.5 wt%, and 1.0 wt%.
- Use an optical model based on the Beer-Lambert law (
A = εbC) to predict light penetration. Lower absorbance (A), achieved via low molar absorptivity (ε) or low concentration (C), favors deeper cure. [35]
In-Situ Cure Measurement:
- Place the formulation in a transparent mold with a thickness of 3-4 mm.
- Irradiate from one side with a high-intensity UV LED (385-405 nm) at a known intensity (e.g., 380 mW/cm²).
- Use a near-infrared spectrometer or a mechanical probe to monitor the polymerization reaction in real-time at the bottom of the mold (e.g., 3 mm depth).
- Record the time to reach the peak polymerization rate.
Analysis and Optimization:
- The formulation that achieves the peak polymerization rate in the shortest time at the target depth is the most efficient.
- As demonstrated in research, a 0.1 wt% BAPO formulation can achieve peak cure at 3 mm depth within 2.5 seconds under continuous UV irradiation. [35]
- Validate the depth of cure by cross-sectioning the cured polymer and measuring the hardened region.
The workflow for this optimization process is outlined below.
The Scientist's Toolkit: Essential Research Reagents
Table 3: Essential Materials for In Vivo Photopolymerization Research
| Category / Item | Function | Specific Example(s) |
|---|---|---|
| Photosensitizers | Light absorption to initiate polymerization. | BODIPY derivatives: High performance under mild conditions. [33] Eosin Y: Biocompatible, water-soluble, activated by green light. [34] |
| Co-initiators | Generate active radicals with the excited PS. | MDEA (Amine-based): Common hydrogen donor. [33] Germanium-based (Ivocerin): Emerging as a less toxic alternative to TPO. [34] |
| Biocompatible Monomers | Form the polymer network matrix. | PEGDA (Poly(ethylene glycol) diacrylate): Hydrophilic, tunable properties. [36] Gelatin Methacryloyl (GelMA): Bioactive, cell-adhesive. [36] |
| Conductive Additives | Impart electrical conductivity to the polymer. | PEDOT:PSS: Stable, biocompatible conductive polymer. [32] [37] Carbon nanotubes (CNTs), MXenes: For nano-composite conductive hydrogels. [37] [36] |
| Light Source | Provides energy for photoinitiation. | Visible Light LEDs (Blue, Green, Red): For tissue penetration and biocompatibility. [4] UV LED Lamps (385-405 nm): For high-intensity curing of specific PIs like BAPO. [35] |
The development of in vivo bioelectronics represents a frontier in therapeutic devices, capable of modulating biological processes for conditions ranging from neurological disorders to cardiac arrhythmias. A significant impediment to their clinical translation, however, lies in the fundamental mismatch between conventional, rigid, pre-fabricated implants and the soft, dynamic biological tissues of the body, often resulting in inflammation, scarring, and device failure [38] [10].
In situ formation of conductive polymers presents a compelling alternative, enhancing biocompatibility and integration. However, many established methods, such as those relying on enzymatic catalysis, suffer from slow, diffusion-controlled kinetics with curing times spanning several hours to days, and offer poor control over the final electrode geometry [38] [10]. This lack of spatial precision limits the creation of complex circuits necessary for advanced bioelectronic interfaces.
Photopolymerization—a process using light to initiate and spatially control the formation of a solid polymer from a liquid monomer solution—offers a powerful solution. The challenge has been adapting this high-precision technology for the demanding environment inside a living organism, where speed, the use of biocompatible, tissue-penetrating light, and non-toxic chemistry are paramount [10]. This Application Note details protocols and data for achieving detailed conductive patterns directly in vivo with curing times of just 5 to 30 minutes, successfully balancing the critical demands of reaction speed and biocompatibility for bioelectronics research.
The following tables consolidate key quantitative data from foundational studies, providing a reference for researchers to design and benchmark their own experiments.
Table 1: In Vivo Photopolymerization Performance Metrics
| Performance Metric | 3E-S with Rose Bengal (Green Light) | 3E-S with SIR-COOH (Red Light) | UC-YT@NY + GelMa (NIR) |
|---|---|---|---|
| Wavelength | 550 nm [10] | 621 nm [10] | 808 nm [39] |
| Irradiance / Power Density | 65 mW cm⁻² [10] | Information Missing | 1.27 W cm⁻² [39] |
| Curing Time | 5 minutes [10] | 15 minutes [10] | 8 minutes [39] |
| Monomer Conversion | High (near-complete at 4% catalyst) [10] | Slightly lower conversion [10] | 96.3% [39] |
| Polymerization Depth | Information Missing | Information Missing | 3 mm (in mouse model) [39] |
| Key Advantage | Fast curing, high conversion [10] | Deeper tissue penetration [10] | Deepest penetration, minimal photothermal damage [39] |
Table 2: Material Properties and Biocompatibility
| Parameter | 3E Monomers (3E-S, 3E-COONa, 3E-PC) | PEDOT-S (Variant A5) | Cellulose Nanocrystal (CNC) Composites |
|---|---|---|---|
| Material Type | EDOT-based trimers (photoactive monomers) [10] | Pre-formed conductive polymer nanoparticle [10] | Natural nanomaterial reinforcement [40] |
| Function | Forms conductive polymer network upon light exposure [10] | Forms temporary conductive hydrogel scaffold; enhances pattern stability [10] | Enhances mechanical properties, reduces shrinkage stress [40] |
| Oxidation Potential | Lower than ETE analogues (e.g., 3E-COONa: 0.10 V vs Ag/AgCl) [10] | Not Applicable | Not Applicable |
| Cell Viability | Similar, favorable effect as ETE monomers [10] | Not Applicable | Biocompatible [40] |
| Key Feature | Enables photopolymerization with visible/red light [10] | Ionic conductivity, absorbs tissue ions [10] | Green, environmentally friendly material [40] |
Experimental Protocols
Protocol: In Vivo Photopolymerization of 3E Monomers in Zebrafish
This protocol describes the formation of conductive PEDOT-S patterns within a living zebrafish embryo, utilizing a mixture of 3E monomers and the PEDOT-S derivative A5, cured with visible light [10].
3.1.1 Research Reagent Solutions
| Item | Function / Explanation |
|---|---|
| 3E Monomers (3E-S, 3E-COONa) | Novel photoactive EDOT-trimer monomers with low oxidation potential, enabling photopolymerization under visible/red light [10]. |
| PEDOT-S (Variant A5) | A pre-formed conductive polymer that acts as a temporary scaffold; photopolymerizing 3Es within it enhances the stability of the final conductive pattern [10]. |
| Rose Bengal | A photocatalyst that absorbs green light (550 nm) and initiates the polymerization reaction via a Single Electron Transfer (SET) mechanism, consuming oxygen [10]. |
| SIR-COOH | A far-red absorbing photocatalyst (excitation max ~650 nm) used for polymerization with deeper tissue-penetrating red light (621 nm) [10]. |
| Phosphate Buffered Saline (PBS) | A physiological buffer used to prepare monomer and catalyst solutions for in vivo injection to ensure biocompatibility. |
| Photolithography Mask | A physical mask with defined patterns placed in the light path to control the geometry of the cured conductive structure [38] [10]. |
3.1.2 Step-by-Step Procedure
- Solution Preparation: Prepare an aqueous solution containing the 3E monomer (e.g., 3E-S at 0.4 - 4 mg mL⁻¹) and the PEDOT-S variant A5. Add the photocatalyst (e.g., Rose Bengal at 4% catalyst loading relative to monomer) and mix thoroughly. The solution can be prepared in a biocompatible buffer like PBS [10].
- Animal Preparation: Anesthetize a zebrafish embryo and position it on a microscope stage for the procedure. All animal experiments must conform to relevant ethical regulations.
- Micro-injection: Using a micro-pipette, inject a small, controlled volume (nL to µL scale) of the prepared monomer/A5/catalyst solution into the target tissue region of the zebrafish embryo.
- Mask Alignment: Align a photolithography mask defining the desired electrode pattern (e.g., lines, squares) between the light source and the target area on the embryo.
- Light Exposure: Expose the injected area to light. For a Rose Bengal-containing solution, use green light (550 nm) at 65 mW cm⁻² irradiance for 5 minutes. For SIR-COOH, use red light (621 nm) for 15 minutes [10].
- Post-Procedure Handling: After curing, return the zebrafish to its aquatic environment and monitor for recovery. The formed conductive pattern is now stable and integrated within the tissue.
Protocol: Upconversion-Assisted Deep-Tissue Photopolymerization
This protocol leverages rare-earth doped nanoparticles to convert deep-penetrating near-infrared (NIR) light into visible light, triggering hydrogel formation for wound healing applications at depths of up to 3 mm [39].
3.2.1 Step-by-Step Procedure
- Hydrogel Hybrid Preparation: Synthesize the core-shell upconversion nanoparticles (NaYF₄:Yb³⁺,Tm³⁺@NaYF₄:Nd³⁺,Yb³⁺) and mix them with the GelMa (gelatin methacryloyl) precursor solution to form the injectable UC-YT@NY + GelMa hybrid [39].
- Animal and Site Preparation: Prepare a mouse wound healing model according to standard surgical procedures.
- Injection into Wound Bed: Inject the UC-YT@NY + GelMa hybrid solution directly into the deep tissue of the wound bed.
- NIR Light Exposure: Irradiate the wound area with an 808 nm NIR laser at a power density of 1.27 W cm⁻² for 8 minutes. The nanoparticles absorb the NIR light and emit at shorter wavelengths, which initiates the cross-linking of the GelMa hydrogel in situ [39].
- Healing Assessment: The resulting hydrogel patch facilitates wound healing, which can be monitored over time. Complete healing has been demonstrated within 7 days in a mouse model [39].
The Scientist's Toolkit: Mechanisms and Workflows
Understanding the underlying chemical mechanisms is crucial for optimizing reactions and troubleshooting. The following diagram illustrates the Single Electron Transfer (SET) pathway identified for the photopolymerization of 3E monomers.
Notes on Process Optimization and Challenges
- Oxygen Inhibition: The SET mechanism consumes oxygen, which is beneficial as oxygen is a potent inhibitor of free-radical polymerization reactions. In standard free-radical systems, oxygen quenches radicals and creates a tacky, uncured surface layer, a significant challenge that can be mitigated by working in inert atmospheres or using higher light intensities [41] [42]. The SET mechanism's oxygen consumption naturally counteracts this issue [10].
- Light Source Selection: The choice between high-power gas discharge lamps and UV-LEDs is critical. LEDs offer instant on/off, longer lifetime, cooler operation, and energy efficiency, but require careful thermal management to maintain wavelength stability and output [43] [44] [45].
- Kinetics and Shrinkage: Photopolymerization is an exothermic reaction with rapid kinetics, which can lead to substantial shrinkage stress and potential mechanical failure. Incorporating nanoparticles like modified Cellulose Nanocrystals (CNCs) can act as cross-linking points to enhance mechanical properties and reduce shrinkage stress [40] [42].
Addressing Challenges in Scalability and Long-Term Material Stability
The integration of photopolymerization techniques into bioelectronics represents a frontier in medical science, enabling the creation of devices that seamlessly interface with biological tissues. However, the path from laboratory innovation to clinical application is paved with two interconnected challenges: achieving manufacturing scalability and ensuring long-term material stability in the complex in vivo environment. Scalability is hindered by the need for high-resolution, reproducible fabrication of often intricate device architectures, while long-term stability is threatened by the harsh physiological conditions that can degrade materials and compromise device function. This application note synthesizes recent advances in materials strategies and fabrication protocols to address these dual challenges, providing a structured framework for researchers developing implantable bioelectronic systems. The solutions outlined herein—from novel polymer chemistries to automated fabrication platforms—are essential for realizing the full potential of bioelectronics in personalized diagnostics and therapeutics.
Material Strategies for Enhanced Stability and Scalability
Advanced Material Classes and Their Properties
The selection of base materials is foundational to overcoming stability and scalability hurdles. Recent research has identified several promising material classes, summarized in Table 1, which balance processability for scalable fabrication with resilience for long-term implantation.
Table 1: Advanced Material Classes for Scalable and Stable Bioelectronics
| Material Class | Key Representatives | Stability Advantages | Scalability Advantages | Primary Applications |
|---|---|---|---|---|
| Smart Photopolymers | Shape Memory Polymers (SMPs), Liquid Crystal Elastomers (LCEs), Active Hydrogels [46] | Responsive to stimuli (pH, temp); tailored degradation profiles [46] | Compatible with high-resolution Vat Photopolymerization (VPP) [47] [46] | 4D-printed dynamic scaffolds, drug delivery systems [46] |
| Biocompatible Composites | Gelatin Methacrylate (GelMA) with Alginate [48], Calcium Phosphate-Polymer composites [47] | Mimics native tissue mechanical properties; robust barrier function [48] | Biological scaffolds support cell growth, reducing device failure [47] [48] | Organ-on-a-chip models (e.g., artificial colon), bone regeneration scaffolds [47] [48] |
| Soft Conductive Materials | PEDOT:PSS, Silver Nanowires, Conductive Nanofiber Networks [49] | Withstand dynamic body movements; stable conformal contact [49] | Can be processed into ultrathin, flexible layers via solution-based methods [49] | Ultraflexible neural interfaces, wearable patch sensors [49] |
Quantitative Stability Performance Data
Evaluating the performance of these materials under simulated or actual in vivo conditions yields critical quantitative data for informed selection. Table 2 compiles key performance metrics from recent studies, highlighting the success of specific material strategies in achieving long-term functionality.
Table 2: Quantitative Stability Performance of Bioelectronic Materials
| Material/Device System | Testing Environment | Key Performance Metric | Reported Stability & Performance Data | Reference |
|---|---|---|---|---|
| Ultrathin OECT based on PEDOT:PSS [49] | Conformal contact with human skin | Transconductance, Signal Quality | Thickness: <5 µm, Transconductance: ~1 mS, High-fidelity ECG measurement [49] | |
| 4-Terminal Vertical OECT [49] | Conformal contact with human skin | Transconductance, Cutoff Frequency | Transconductance: >400 mS, Cutoff Frequency: 2 kHz, Stable measurement of ECG, EOG, EMG [49] | |
| Calcium Phosphate Scaffolds via VP [47] | In vitro bone regeneration models | Architectural Fidelity, Mechanical Properties | Complex geometries (e.g., Triply Periodic Minimal Surfaces) enhance osteogenic performance & mechanical stability [47] | |
| 3D-IVM-HC Artificial Colon (GelMA/Alginate) [48] | Drug screening (5-fluorouracil) | Drug Response Fidelity | Showed drug resistance mirroring in vivo tumors, requiring ~10x higher doses than 2D cultures for same effect [48] | |
| Baroreflex Activation Therapy (BAT) [50] | HFrEF Patients (6-month post-therapy) | Inflammatory Biomarkers | 94% decrease in heart failure hospitalizations; Significant reduction in TNF-α and IFN-γ [50] |
Experimental Protocols for Fabrication and Testing
Protocol 1: Automated High-Throughput Screening of Photopolymer Formulations
Objective: To rapidly identify optimal photopolymer formulations with balanced mechanical, electrical, and biological properties for scalable bioelectronics fabrication. Background: The Studying-Polymers-On-a-Chip (SPOC) platform demonstrates how automation can accelerate the optimization of complex material systems, such as polymer electrolytes for bioelectronics [51].
Materials & Reagents:
- SPOC or equivalent automated platform: Integrates active-mixing, deposition, and on-machine characterization [51].
- Photopolymer resin inputs: Base monomers/oligomers, photoinitiators, conductive fillers (e.g., PEDOT:PSS), and biocompatibility modifiers.
- Custom PCB electrode substrate array: For in-situ electrical characterization (e.g., impedance, conductivity).
- Curing source: Wavelength-specific light source (UV/visible) integrated into the platform.
Procedure:
- Design Space Definition: Define the compositional parameter space for the resin inputs (e.g., ratios of two base compositions, filler concentrations) [51].
- Automated Workflow Execution: a. The robotic system mixes resin compositions at varying ratios according to the design space [51]. b. The mixed resin is deposited onto the PCB electrode array and cured using the integrated light source [51]. c. Ionic conductivity (or other target properties) is measured immediately using the custom PCB substrate [51].
- Data Pipeline & Analysis: a. Measurement data is fed automatically into a centralized, structured database [51]. b. Machine learning algorithms analyze the data to map the composition-property landscape and recommend the next set of experiments for iterative optimization [51].
- Validation: Down-selected top-performing formulations undergo secondary validation for cytocompatibility and long-term stability in simulated physiological conditions.
Troubleshooting:
- Issue: Poor repeatability in high-viscosity resin handling. Solution: Incorporate Direct-Ink-Write (DIW) inspired mechanisms designed for viscosities up to millions of cP [51].
- Issue: Inefficient exploration of a vast parameter space. Solution: Implement active learning or Bayesian optimization within the ML feedback loop to maximize information gain per experiment [51].
Protocol 2: Fabrication of a Bioelectronic-Integrated 3D Human Colon Model
Objective: To create a physiologically relevant, stable human colon model for long-term disease study and drug screening, demonstrating scalable organ-on-a-chip fabrication [48].
Materials & Reagents:
- Scaffold Materials: Gelatin Methacrylate (GelMA), Alginate.
- Cell Lines: Human colon epithelial cells, fibroblasts.
- Bioelectronics: Flexible microelectrodes (e.g., Au, Pt, or PEDOT:PSS), FPCB with integrated wireless communication module [49].
Procedure:
- Scaffold Fabrication: a. Create a support matrix by mixing GelMA with alginate [48]. b. Fabricate a 3D scaffold (~5 x 10 mm) with luminal curvature and crypt-like structures using a high-precision VPP 3D printer [48].
- Cell Seeding and Maturation: a. Seed human colon epithelial cells to line the inner surface of the scaffold [48]. b. Embed supportive fibroblasts within the outer layer of the scaffold [48]. c. Culture the construct for approximately two weeks to allow for maturation and the development of robust cell-to-cell interactions [48].
- Bioelectronics Integration: a. Pattern flexible, biocompatible electrodes onto the scaffold surface or in close proximity to the tissue [48] [49]. b. Integrate the electrodes with a flexible FPCB for signal readout and, optionally, wireless data transmission [49].
- Functional Validation: a. Confirm tissue integrity and barrier function (e.g., transepithelial electrical resistance). b. Validate the model's physiological relevance by testing chemotherapeutic agent response (e.g., 5-fluorouracil) and comparing the dose-response profile to known in vivo resistance data [48].
Troubleshooting:
- Issue: Inadequate cell density or organization. Solution: Optimize the scaffold's porosity and surface functionalization to promote robust cell adhesion and tissue formation [48].
- Issue: Signal drift or noise from integrated electronics. Solution: Ensure conformal contact between electrodes and tissue using ultrathin, flexible electrode designs and stable adhesive interfaces [49].
The Scientist's Toolkit: Essential Research Reagents and Materials
Table 3: Key Reagent Solutions for In Vivo Photopolymerization Research
| Item Name | Function/Application | Specific Example/Note |
|---|---|---|
| Gelatin Methacrylate (GelMA) | Biocompatible hydrogel for cell-laden scaffolds; provides cell-adhesion motifs [48]. | Used as a key component in the bioelectronic-integrated 3D human colon model [48]. |
| Poly(3,4-ethylenedioxythiophene): Poly(styrenesulfonate) (PEDOT:PSS) | Conductive polymer for soft, flexible electrodes and transistors; minimizes mechanical mismatch [49]. | Formulated as a printable ink for OECTs in wearable and implantable sensors [49]. |
| Calcium Phosphate-based Slurries | Ceramic-polymer composite for bone-regeneration scaffolds; offers osteoconductivity [47]. | Optimized for VPP to create scaffolds with advanced pore architectures (e.g., Triply Periodic Minimal Surfaces) [47]. |
| Shape Memory Polymers (SMPs) & Liquid Crystal Elastomers (LCEs) | "Smart" polymers for 4D printing; enable shape transformation in response to stimuli [46]. | Used in VPP to create dynamic biomedical devices like self-fitting stents and soft robotics [46]. |
| High-Viscosity Photopolymer Resins | Custom formulations for specialized applications (e.g., batteries, robust implants) [51]. | Require DIW-inspired automation platforms (e.g., SPOC) for handling and screening [51]. |
Workflow and System Diagrams
The following diagrams outline the core logical and experimental workflows for developing stable, scalable bioelectronic devices.
Stability-by-Design Strategy Framework
Automated Photopolymer Screening Workflow
Benchmarking Performance: In Vivo Validation and Comparative Analysis
In vivo models are indispensable in biomedical research, providing the complex physiological context necessary to evaluate the safety and efficacy of new therapeutic agents and medical devices. A robust validation strategy that progresses from small, high-throughput models to larger, more translationally relevant animals is crucial for successful clinical translation. This progression ensures that initial discoveries are systematically vetted in whole-organism systems that increasingly approximate human physiology.
The zebrafish (Danio rerio) has emerged as a powerful, complementary vertebrate model that bridges the gap between traditional in vitro assays and mammalian in vivo testing. Its unique combination of physiological complexity, optical transparency, and small size makes it particularly valuable for the initial validation of novel technologies such as bioelectronic devices created via in vivo photopolymerization. This document outlines standardized protocols for validating therapeutic interventions and medical devices across animal models, with specific application to emerging bioelectronics research.
Zebrafish as a Preliminary Validation Model
Advantages and Validation Metrics
The zebrafish model offers several distinct advantages for early-stage preclinical validation, especially for novel approaches like in vivo photopolymerization for bioelectronics. Its external fertilization, rapid embryonic development, and optical transparency during early life stages permit direct visualization of integrated bioelectronics and their effects on surrounding tissues [52] [53]. Furthermore, zebrafish share approximately 70-80% of their genome with humans, and about 84% of human disease-associated genes have zebrafish counterparts, providing substantial genetic relevance for disease modeling and therapeutic testing [54] [55].
Quantitative validation of the zebrafish model demonstrates its predictive value for mammalian systems. A 2021 study systematically validated zebrafish for developmental toxicity testing, achieving 90.3% sensitivity and 88.9% overall predictability for teratogenic effects after protocol optimization, including refined teratogenic index (TI) cut-off values and additional assessment time points [56]. For acute toxicity prediction, strong correlations exist between zebrafish embryo LC50 (Lethal Concentration 50) and rodent LD50 (Lethal Dose 50) values across diverse chemical compounds [53].
Table 1: Key Validation Metrics for Zebrafish Toxicity Testing
| Validation Parameter | Performance Metric | Experimental Context |
|---|---|---|
| Developmental Toxicity Predictivity | 88.9% Overall Accuracy | 31 ICH-positive, 14 ICH-negative compounds [56] |
| Acute Toxicity Correlation | Strong correlation to rodent LD50 | 60+ test chemicals [53] |
| Embryo vs. Juvenile Sensitivity | Highly comparable results | 143 test substances [53] |
| Throughput Capability | 6-384 well plate formats | High-throughput screening [56] |
Protocol: Zebrafish Developmental Toxicity Assay (Optimized)
This protocol is adapted from validated methods for assessing compound teratogenicity in zebrafish, with considerations for evaluating bioelectronic materials and their leachates [56] [57] [54].
Materials and Reagents
- Adult Zebrafish: AB strain or other well-characterized lines, maintained at 28°C on a 14:10 light:dark cycle [56]
- Embryo Medium: Fish water (0.2% Instant Ocean Salt in deionized water, pH 6.9–7.2, conductivity 480–510 μS/cm) [56]
- Test Compounds/Materials: Compounds for evaluation or materials for bioelectronics (e.g., photopolymerizable resins)
- Equipment: Stereomicroscope, 24-well or 96-well plates, temperature-controlled incubator (28°C) [53]
Experimental Procedure
- Egg Collection and Screening: Collect newly fertilized eggs (< 6 hours post-fertilization, hpf) from group spawns. Screen under a stereomicroscope to select fertilized, developmentally normal embryos [56] [53].
- Exposure Setup: Transfer 1-5 embryos per well into multi-well plates containing embryo medium. For material leachate testing, incubate cured materials in embryo medium for 24 hours and use this conditioned medium for exposure [57].
- Chemical/Material Exposure:
- Exposure Duration and Maintenance: Incubate embryos at 28°C for up to 5 days post-fertilization (dpf). Renew test solutions or medium daily to maintain compound stability and water quality [56] [53].
- Endpoint Assessment:
- Lethal Endpoints (record at 24, 48, 72, 96 hpf): Coagulation, lack of somite formation, non-detachment of tail, lack of heartbeat (after 48 hpf) [53].
- Teratogenic Endpoints (assess at 2 and 5 dpf): Malformations (yolk sac edema, pericardial edema, spinal curvature), reduced body length, pigmentation defects, impaired swim bladder inflation [56] [57].
- Neurodevelopmental and Behavioral Endpoints (at 5-6 dpf): Spontaneous movement, touch-evoked escape response, locomotor activity [53].
Data Analysis and Interpretation
- Calculate LC50 (concentration lethal to 50% of embryos) and EC50 (concentration causing malformations in 50% of embryos) using probit analysis or non-linear regression [54].
- Determine Teratogenic Index (TI): TI = LC50/EC50. A TI ≥ 3 (with optimized concentration ranges) indicates significant teratogenic potential [56].
- For bioelectronics validation, compare incidence of malformations and mortality between treatment and control groups using appropriate statistical tests (e.g., one-way ANOVA with post-hoc testing) [57].
Figure 1: Zebrafish Developmental Toxicity Testing Workflow. The diagram outlines the key steps for validating compounds or materials in zebrafish, from egg collection through final predictivity assessment for mammalian systems.
Transitioning to Larger Animal Models
Rationale and Strategic Approach
While zebrafish provide excellent preliminary data, their physiological differences from mammals necessitate validation in larger animal models before clinical translation. The transition strategy should be guided by specific research questions and the intended clinical application of the technology.
Key considerations for model selection include:
- Pharmacokinetic/Pharmacodynamic (PK/PD) Profiling: Rodent models provide initial mammalian PK/PD data, while larger species (e.g., rabbits, pigs) better approximate human drug metabolism and distribution [58].
- Disease Pathophysiology: Select models that accurately recapitulate specific human disease pathways. Zebrafish models exist for neurodegenerative diseases, cancer, and metabolic disorders, but mammalian models are essential for validating complex pathophysiology [52] [55].
- Bioelectronic Integration and Function: For in vivo photopolymerized bioelectronics, larger models are necessary to assess surgical implantation feasibility, chronic tissue compatibility, and functional integration with human-scale anatomical structures [4].
Table 2: Comparative Advantages of Animal Models in Therapeutic Development
| Model System | Key Advantages | Limitations | Ideal Applications |
|---|---|---|---|
| Zebrafish | High throughput, optical transparency, genetic manipulability, low cost | Physiological differences from mammals, small size | Early toxicity screening, initial efficacy assessment, genetic screening |
| Rodent Models | Well-characterized physiology, diverse genetic models, established protocols | Limited translational predictivity for some diseases, small size | Preliminary mammalian PK/PD, disease mechanism studies |
| Rabbit Models | Intermediate size, suitable for device testing, established disease models | Limited genetic tools, higher maintenance costs | Medical device safety, ophthalmology research, orthopedic studies |
| Porcine Models | Similar organ size/physiology to humans, suitable for surgical training | High costs, specialized housing requirements | Advanced bioelectronic integration, surgical technique development |
Protocol: In Vivo Photopolymerization for Bioelectronic Interfaces
This protocol describes the validation of photopolymerized conductive hydrogels formed directly in living tissue, a technique with promising applications in neuromodulation and bioelectronic medicine [4].
Materials and Reagents
- Photoinitiator System: Biocompatible photoinitiators (e.g., riboflavin, Eosin Y) or synthetic alternatives with established safety profiles [57]
- Monomer Solution: Light-sensitive, biocompatible monomers (e.g., thiol-based monomers as lower-toxicity alternatives to methacrylates) [57] [4]
- Light Source: LED or laser systems with appropriate wavelengths (blue, green, or red light) and controlled intensity [4]
- Conductive Components: Biocompatible conductive polymers or nanomaterials
- Animal Models: Zebrafish embryos (for preliminary testing), then progression to rodent models (rats, mice), and ultimately larger species (chicken embryos, potentially pigs) for scaling studies [4]
Experimental Procedure
- Formulation Preparation:
- Prepare monomer solution containing photoinitiator and conductive components in physiological buffer.
- Conduct preliminary cytotoxicity screening using in vitro cell cultures or zebrafish embryos to establish biocompatibility [57].
- Administration and Photopolymerization:
- Zebrafish Embryo Model: Microinject small volumes (1-10 nL) of formulation into target tissues (e.g., neural tube, yolk sac) at appropriate developmental stages (e.g., 24-48 hpf) [4].
- Larger Animal Models: Administer via minimally invasive injection or direct application to target tissue in anesthetized animals following approved surgical protocols.
- Light Exposure: Expose injection site to controlled light (wavelength: blue, green, or red; duration: 5-30 minutes; intensity: optimized for tissue penetration and minimal thermal damage) [4].
- In Vivo Validation and Assessment:
- Conductivity Measurements: Verify electrical properties of formed bioelectronics using impedance spectroscopy or direct current measurement [4].
- Functional Integration: Assess bioelectronic function through electrophysiological recordings (e.g., neural signal modulation, electrical stimulation) [4].
- Biocompatibility Evaluation: Monitor animals for acute and chronic inflammatory responses, fibrosis, and tissue integration over predetermined endpoints (e.g., 1, 4, 12 weeks) [57] [4].
- Degradation Profile: For biodegradable formulations, track material clearance and tissue restoration over time [4].
Data Analysis and Interpretation
- Quantify electrical properties (impedance, charge storage capacity, charge injection limits) and compare to conventional bioelectronic materials.
- Assess functional efficacy through specific physiological endpoints (e.g., nerve conduction velocity, muscle contraction strength, biomarker expression).
- Use histological scoring systems to evaluate tissue response (inflammation, fibrosis, necrosis) at the material-tissue interface.
- Compare performance metrics across species (zebrafish → rodent → larger models) to establish translational correlations.
Figure 2: In Vivo Photopolymerization Validation Pathway. This diagram illustrates the key stages in developing and validating photopolymerized bioelectronics, from initial formulation through cross-species functional assessment.
The Scientist's Toolkit: Essential Research Reagents
Table 3: Key Reagents for In Vivo Model Validation
| Reagent Category | Specific Examples | Function and Application |
|---|---|---|
| Zebrafish Model Components | AB strain zebrafish, Wild-type lines, Transgenic reporter lines (e.g., GFP-labeled neurons) | Provide standardized, genetically tractable models for high-throughput screening and visualization [56] [52] |
| Photopolymerization System | Thiol-based monomers, Biocompatible photoinitiators (riboflavin, Eosin Y), Conductive polymers | Enable in vivo formation of bioelectronic interfaces with reduced cytotoxicity compared to traditional acrylates [57] [4] |
| Toxicity Assessment Reagents | Instant Ocean Salt, Cell viability assays (MTT, resazurin), Histological stains (H&E) | Support standardized toxicity testing across models and enable comparative analysis of tissue responses [56] [57] [53] |
| Analytical Tools | HPLC-MS systems, GC-MS, Impedance spectrometers, Behavioral tracking systems | Facilitate characterization of material properties, compound concentrations, and functional biological responses [57] [54] [53] |
A systematic approach to in vivo model validation, progressing from zebrafish to larger animal models, provides a robust framework for evaluating the safety and efficacy of novel therapies and medical technologies. The standardized protocols outlined here for zebrafish developmental toxicity testing and in vivo photopolymerization validation provide researchers with actionable methodologies for generating reproducible, translatable data. As bioelectronic medicine continues to advance, these validation pipelines will be crucial for ensuring that promising laboratory discoveries successfully transition to clinical applications that benefit patients.
The integration of bioelectronics with biological tissues represents a frontier in therapeutic and diagnostic medicine. Conventional, pre-formed implants often face significant challenges due to mechanical mismatch and foreign-body responses, leading to inflammation, scarring, and signal degradation over time [10] [59]. To overcome these limitations, in situ fabrication strategies have emerged. This analysis compares three paradigms: traditional Pre-formed Implants, Enzymatic Catalysis for in situ formation, and the more recent In Vivo Photopolymerization. The content is framed within a broader thesis on in vivo photopolymerization, highlighting its potential to redefine the fabrication of conductive structures directly within living tissue.
The table below summarizes the core characteristics, advantages, and limitations of the three biofabrication strategies.
Table 1: Comparative Analysis of Biofabrication Strategies for Conductive Bioelectronics
| Feature | Pre-formed Implants | Enzymatic Catalysis | In Vivo Photopolymerization |
|---|---|---|---|
| Spatial Control | High (pre-defined) [10] | Low (diffusion-controlled) [10] | High (defined by photolithography masks) [10] [4] |
| Temporal Control (Curing) | N/A (pre-made) | Slow (hours to days) [10] | Fast (5–30 minutes) [10] [4] |
| Biocompatibility & Tissue Integration | Often poor; inflammation, scarring, mechanical mismatch [59] | Enhanced biocompatibility [10] | Tissue-friendly, seamless integration, biodegradable [4] |
| Structural Complexity | High (via microfabrication) [60] [59] | Basic electrode structures [10] | Complex, layered, and 3D patterns [10] |
| Key Challenge | Chronic inflammation, signal degradation [59] | Limited geometry precision, slow kinetics [10] | Limited depth penetration, requires photoinitiators |
Quantitative Performance Data
Key quantitative metrics for the in situ formation methods are compared in the following table.
Table 2: Quantitative Performance Metrics of In Situ Fabrication Methods
| Parameter | Enzymatic Catalysis | In Vivo Photopolymerization |
|---|---|---|
| Typical Curing Time | Several hours to days [10] | 5 to 30 minutes [10] [4] |
| Spatial Resolution | Governed by diffusion, low resolution [10] | Defined by photomasks; enables micron-scale features [10] |
| Wavelength Used | N/A (biochemical reaction) | Green (550 nm), Red (621 nm), Far-UV (385 nm) [10] |
| Light Power | N/A | 65 mW cm⁻² (for green light) [10] |
| Catalyst Loading | Enzyme-dependent (e.g., HRP) | ~4% Rose Bengal for complete reaction in 5 min [10] |
Experimental Protocols
Protocol: In Vivo Photopolymerization of PEDOT-S Derivatives
This protocol details the formation of conductive patterns within living tissue using light, as demonstrated in zebrafish and chicken embryo models [10].
I. Reagent Preparation
- Monomer Solution: Prepare an aqueous solution of 3E (EDOT-trimer) monomers (e.g., 3E-S, 3E-COONa, or 3E-PC) at a concentration of 0.4 mg/mL.
- Photocatalyst:
- For green light polymerization: Add Rose Bengal to the monomer solution at 4% catalyst loading.
- For red light polymerization: Add the far-red fluorescent SIR-COOH dye to the monomer solution.
- Optional Hydrogel Precursor: To form enhanced conductive patterns, mix the 3E monomer solution with the PEDOT-S variant A5, which forms a temporary ion-responsive hydrogel in vivo [10].
II. In Vivo Injection and Patterning
- Administer Monomers: Inject the prepared monomer-photocatalyst solution into the target tissue of the animal model (e.g., brain, muscle).
- Apply Photomask: Position a photolithography mask over the tissue to define the geometry of the desired conductive pattern.
- Light Exposure: Expose the masked tissue to light.
- For Rose Bengal catalyst: Use green light (550 nm, 65 mW cm⁻²) for 5 minutes.
- For SIR-COOH catalyst: Use red light (621 nm) for 15 minutes.
- Polymerization: The light exposure triggers a Single Electron Transfer (SET) mechanism, consuming oxygen and forming hydrogen peroxide as a by-product, leading to the polymerization of the 3E monomers into conductive poly(3,4-ethylenedioxythiophene) (PEDOT) derivatives [10].
- Validation: Confirm polymerization via a visible color change to a dark blue-green and characterize the conductive structure using electrochemical impedance spectroscopy.
Protocol: Enzymatic Polymerization of Conductive Polymers
This protocol outlines a general method for forming conductive polymers in vivo using enzymatic catalysis, such as with Horseradish Peroxidase (HRP) [10] [61].
I. Reagent Preparation
- Monomer Solution: Prepare a solution of the monomer (e.g., pyrrole, aniline derivatives, or phenol derivatives) in a biocompatible buffer.
- Enzyme Solution: Prepare a solution of the oxidizing enzyme (e.g., HRP or laccase) in the same buffer.
- Oxidant Solution: Prepare a solution of the enzymatic oxidant, typically hydrogen peroxide (H₂O₂).
II. In Vivo Polymerization
- Co-injection/Administration: Introduce the monomer and enzyme solutions simultaneously into the target tissue. This can be achieved via co-injection or by leveraging endogenous enzymes or those expressed through genetic engineering [10].
- Initiation: The polymerization is initiated upon the introduction of the oxidant (H₂O₂) or through the action of endogenous metabolites.
- Reaction Progression: The enzyme catalyzes the oxidation of the monomer, leading to the formation of free radicals and subsequent polymer chain propagation. This process is diffusion-controlled and proceeds at room temperature.
- Curing and Formation: Allow the reaction to proceed for several hours to days for complete polymerization, resulting in a conductive hydrogel or coating with basic structural form [10].
Signaling Pathways and Workflows
Photopolymerization Experimental Workflow
The following diagram illustrates the end-to-end experimental workflow for creating bioelectronics via in vivo photopolymerization.
Diagram 1: Photopolymerization experimental workflow.
Photopolymerization Chemical Mechanism
This diagram outlines the Single Electron Transfer (SET) mechanism underlying the oxidative photopolymerization process.
Diagram 2: Photopolymerization SET mechanism.
The Scientist's Toolkit: Research Reagent Solutions
The table below lists key materials and reagents essential for conducting experiments in in vivo photopolymerization for bioelectronics.
Table 3: Essential Research Reagents for In Vivo Photopolymerization
| Reagent/Material | Function/Description | Example & Notes |
|---|---|---|
| 3E Monomers | Photoactive EDOT-trimer building blocks for conductive polymers. | 3E-S, 3E-COONa, 3E-PC. Chosen for lower oxidation potential compared to ETE derivatives [10]. |
| Photocatalysts | Absorbs light to initiate the radical polymerization reaction. | Rose Bengal (for green light, 550 nm). SIR-COOH (for red light, 621 nm) [10]. |
| PEDOT-S Variant A5 | Forms a temporary conductive hydrogel scaffold in vivo. | Mixed with 3E monomers to enhance pattern stability and conductivity [10]. |
| Photolithography Masks | Defines the spatial geometry of the polymerized conductive pattern. | Custom masks with micron-scale features to create circuits [10]. |
| Light Sources | Provides specific wavelengths to activate the photocatalyst. | LED sources at 385 nm (UV), 550 nm (Green), 621 nm (Red). Red light is preferred for deeper tissue penetration [10] [4]. |
| Conducting Polymer | Benchmark conducting material for coating electrodes. | PEDOT:PSS used in pre-formed, flexible bioelectronics to reduce impedance [60]. |
Integrating electronics with biological systems holds immense potential for therapeutic applications, from deep brain stimulation to pacemaker devices. However, a significant challenge persists: conventional bioelectronics often rely on rigid, metallic materials that cause a mechanical mismatch with soft, dynamic biological tissues. This mismatch frequently leads to inflammation, scarring, and eventual signal loss [10]. Prefabricated, substrate-bound conductive polymer (CP) devices, while better mimicking tissue properties, still face similar biocompatibility limitations [10].
An emerging solution lies in the in situ assembly of conductive polymers within living organisms (in vivo). Early methods utilizing enzymatic catalysis showed improved biocompatibility but were governed by slow diffusion kinetics, requiring curing times from several hours to days and offering minimal control over the final electrode geometry [10]. Recent breakthroughs have demonstrated that photopolymerization enables the formation of biocompatible conductive structures directly inside living tissue, such as in zebrafish and chicken embryos [10]. This approach achieves spatial control of electrode patterns using light, dramatically reduces curing times to 5-30 minutes, and opens the possibility of creating complex, layered circuits in a biological environment [10] [1]. This application note details the protocols and assessments for implementing this photopolymerization technique to create bioelectronic interfaces that minimize inflammatory response and tissue scarring.
Key Comparative Data: Photopolymerization vs. Conventional Methods
The following table summarizes the quantitative advantages of the described in vivo photopolymerization method over other approaches for forming conductive structures within the body.
Table 1: Comparative Analysis of Methods for Forming Conductive Structures In Vivo
| Method | Curing Time | Spatial Control | Biocompatibility & Scarring | Key Materials |
|---|---|---|---|---|
| Implanted Rigid Electrodes | N/A (Prefabricated) | High | High inflammation and scarring [10] | Metals, rigid substrates |
| In Situ Enzymatic Catalysis | Several hours to days [10] | Low (Diffusion-controlled) [10] | Improved biocompatibility [10] | Monomers (e.g., ETE derivatives), HRP, H₂O₂ [10] |
| In Vivo Photopolymerization | 5 - 30 minutes [10] | High (Patterned via photolithography) [10] | Enhanced integration, reduced scarring [10] | 3E monomers (e.g., 3E-S, 3E-COONa), A5 nanoparticles, Rose Bengal, SIR-COOH [10] |
Further characterization of the photopolymerization process itself provides critical parameters for protocol optimization.
Table 2: Photopolymerization Parameters and Material Properties
| Parameter | Condition 1 | Condition 2 | Impact on Outcome |
|---|---|---|---|
| Light Wavelength | Green light (550 nm) [10] | Red light (621 nm) [10] | Red light offers better tissue penetration [10]. |
| Photocatalyst | Rose Bengal (4% loading) [10] | SIR-COOH [10] | SIR-COOH enables use of deeper-penetrating red light [10]. |
| Reaction Completion | ~5 minutes (with 4% Rose Bengal) [10] | ~15 minutes (with SIR-COOH) [10] | Faster curing is crucial for in vivo viability [10]. |
| Polymerization Outcome | Dimers formed [10] | Dimers and Trimers formed [10] | Longer reaction with SIR-COOH yields more complex polymers [10]. |
Experimental Protocols
Synthesis and Preparation of Photoactive Monomers
The protocol centers on novel EDOT-trimer (3E) monomers, which have a lower oxidation potential than their ETE counterparts, making them suitable for photopolymerization [10].
Materials:
- 3E monomer derivatives: 3E-S, 3E-COONa, or 3E-PC [10].
- A5 nanoparticles: A poly(3,4-ethylenedioxythiophene)butoxy-1-sulfonate (PEDOT-S) derivative that forms a temporary conductive hydrogel in vivo [10].
- Photocatalyst: Rose Bengal for green light or SIR-COOH for red light applications [10].
- Aqueous solvent (e.g., deionized water, physiological buffer).
Procedure:
- Monomer Solution Preparation: Dissolve the selected 3E monomer in an aqueous solvent at a concentration of 0.4 mg/mL. For higher concentrations (e.g., 4 mg/mL), ensure a large surface-area-to-volume ratio during photopolymerization to maintain reaction efficiency [10].
- Photocatalyst Addition: Add the photocatalyst to the monomer solution. A catalyst loading of 4% is recommended for complete reaction within approximately 5 minutes when using Rose Bengal [10].
- A5 Nanoparticle Integration (Optional): For enhanced stability and pattern formation, mix the 3E monomer solution with A5 nanoparticles. The 3Es will photopolymerize within the pre-formed A5 hydrogel matrix, stabilizing only the light-exposed regions [10].
In Vivo Photopolymerization and Patterning
This procedure enables the formation of defined conductive patterns within living tissue models, such as zebrafish or chicken embryos.
Materials:
- Prepared monomer/photo catalyst/A5 solution.
- Light source: LED or laser system emitting at 550 nm (green) or 621 nm (red) [10].
- Photolithography mask with desired electrode pattern.
- Animal model (e.g., zebrafish Danio rerio, chicken embryo Gallus gallus) [10].
- Appropriate animal ethics and surgical equipment.
Procedure:
- Administration: Introduce the prepared solution into the target tissue of the animal model via injection or other suitable delivery method.
- Mask Alignment: Position a photolithography mask over the target area to define the geometry of the conductive structure [10].
- Light Exposure: Expose the masked area to the appropriate light wavelength.
- Curing Completion: A dark blue-green color indicates the formation of the conjugated polymer. The conductive pattern, defined by the mask, is now stabilized within the tissue [10].
- Validation: Excise the tissue and analyze the formed polymer using techniques like UV-Vis spectroscopy to confirm the characteristic broad absorption peak around 600 nm, or MALDI MS to determine oligomer formation (dimers/trimers) [10].
Assessment of Biocompatibility and Inflammatory Response
Evaluating the success of the intervention involves quantifying the foreign body response compared to traditional implants.
Materials:
- Tissue samples with photopolymerized structures and control implants.
- Histological staining reagents (e.g., H&E, Masson's Trichrome).
- Immunofluorescence markers for immune cells (e.g., CD68 for macrophages).
- Microscopy and image analysis software.
Procedure:
- Tissue Harvesting: At predetermined time points (e.g., 1, 2, and 4 weeks post-implantation), harvest the tissue containing the photopolymerized structure or control implant.
- Histological Processing: Fix, section, and stain the tissue samples.
- Use Hematoxylin and Eosin (H&E) to assess general tissue architecture and immune cell infiltration.
- Use Masson's Trichrome to visualize collagen deposition, indicating fibrotic scar tissue formation.
- Immunofluorescence Staining: Label sections with antibodies against specific immune cell markers (e.g., macrophages) to characterize the inflammatory response.
- Quantitative Analysis:
- Measure the thickness of the fibrotic capsule surrounding the implant.
- Count the density of immune cells in the immediate proximity of the implant.
- Compare these metrics between photopolymerized structures and traditional rigid electrodes. The photopolymerized structures are expected to show a significantly reduced fibrotic capsule and lower immune cell density [10].
Signaling Pathways in the Foreign Body Response
The following diagram illustrates the key cellular and molecular events in the foreign body response to implanted materials, highlighting points where the photopolymerization approach mitigates this response.
Diagram 1: Foreign body response pathway. The photopolymerization approach (green) mitigates key stages of the inflammatory and fibrotic response by minimizing the initial mechanical mismatch, leading to enhanced integration.
Experimental Workflow for In Vivo Photopolymerization
The end-to-end process for creating and evaluating patterned conductive structures in vivo is outlined below.
Diagram 2: Experimental workflow. The process is divided into three phases: material preparation, in vivo polymerization and patterning, and final analysis of the structure's properties and biocompatibility.
The Scientist's Toolkit: Essential Research Reagents
This table catalogs the key materials required to implement the in vivo photopolymerization protocol.
Table 3: Essential Reagents for In Vivo Photopolymerization
| Item Name | Function/Description | Application Notes |
|---|---|---|
| 3E Monomers (3E-S, 3E-COONa, 3E-PC) [10] | Novel EDOT-based trimers with low oxidation potential; the photoactive building blocks for the conductive polymer. | 3E-S, 3E-COONa, and 3E-PC have oxidation potentials of 0.47 V, 0.10 V, and 0.05 V vs Ag/AgCl, respectively [10]. |
| A5 Nanoparticles [10] | A PEDOT-S derivative that forms a temporary, ion-conducting hydrogel in vivo, providing a scaffold for polymerization. | Photopolymerizing 3Es within the A5 hydrogel enhances stability specifically in the light-exposed regions [10]. |
| Rose Bengal [10] | A photocatalyst that enables polymerization under green light (550 nm) via a Single Electron Transfer (SET) mechanism. | A 4% catalyst loading is sufficient for near-complete monomer conversion in ~5 minutes [10]. |
| SIR-COOH [10] | A far-red fluorescent dye analog used as a photocatalyst for polymerization under red light (621 nm). | Enables deeper tissue penetration due to longer wavelength. Reaction takes ~15 minutes and can yield higher-order oligomers like trimers [10]. |
| Photolithography Mask [10] | A patterned mask used to define the geometry of the conductive structure during light exposure. | Critical for achieving spatial control and creating complex, layered circuits in vivo [10]. |
Evaluating Electrical Performance and Signal Fidelity
In vivo photopolymerization represents a transformative approach in the field of bioelectronics, enabling the direct formation of conductive materials within living organisms. This technique allows researchers to create detailed conducting patterns and tissue-friendly bioelectronics that seamlessly integrate with biological systems, thereby addressing fundamental challenges associated with traditional bioelectronic implants, such as inflammation, scarring, and mechanical mismatch [4]. The ability to form soft, conductive hydrogels directly in tissue through light exposure offers unprecedented opportunities for creating bioelectronic interfaces that maintain superior signal fidelity and electrical performance in physiological environments.
The fundamental principle involves using light-sensitive materials as building blocks that undergo photopolymerization when exposed to specific wavelengths of light (blue, green, or red). This process forms electrically conductive polymer structures within 5 to 30 minutes of irradiation [4]. These in situ formed electrodes demonstrate exceptional biocompatibility and conformability with various biological surfaces, from rigid substrates to flexible textiles and living tissues. The technology has shown promising results in animal trials, including zebrafish and chicken embryos, with planned evaluation in larger animal models [4].
For bioelectronic applications, maintaining signal fidelity—the accurate transmission and reception of electrical signals without distortion—is paramount. The electrical performance of these photopolymerized materials directly impacts their effectiveness in applications such as neural recording, neurostimulation, and biosensing. This document outlines standardized protocols and evaluation metrics to assess these critical parameters, providing researchers with a framework for developing and optimizing photopolymerized bioelectronic systems.
Performance Characterization and Data
Rigorous characterization of electrical properties is essential for predicting in vivo performance. The following parameters must be evaluated for any photopolymerized bioelectronic material.
Table 1: Key Electrical Performance Metrics for Photopolymerized Bioelectronics
| Parameter | Measurement Techniques | Target Range | Significance for Bioelectronics |
|---|---|---|---|
| DC Conductivity | Two-point probe, Four-point probe | Material-dependent | Determines baseline charge transport efficiency; affects power consumption and signal strength |
| Impedance Spectrum | Electrochemical Impedance Spectroscopy (EIS) | Frequency-dependent: 82 kΩ - 1.19 GΩ (at 10 Hz) [62] | Critical for neural recording fidelity; lower impedance at relevant frequencies (1-10 kHz) reduces thermal noise |
| Capacitance | LCR Meter | Frequency-dependent: 3.29 - 14.7 pF (10 Hz-300 kHz) [62] | Affects signal transfer in capacitive interfaces; influences high-frequency response |
| Volumetric Capacitance | Cyclic Voltammetry | State-of-the-art values for OMIECs [17] | Key for organic electrochemical transistor (OECT) performance; determines charge injection capacity |
| Sheet Resistance | Four-point probe | Application-specific | Important for large-area electrodes and interconnects; impacts signal uniformity |
Beyond these fundamental electrical properties, the stability of these parameters in physiological conditions must be assessed. This includes evaluating performance over time in phosphate-buffered saline (PBS) or other biologically relevant electrolytes at 37°C, typically over 2-4 week periods. Additionally, the charge storage capacity (CSC) and charge injection capacity (CIC) are critical metrics for stimulating electrodes, determining how much charge can be safely delivered to tissue.
Table 2: Signal Fidelity Assessment in Biological Context
| Assessment Method | Measured Parameters | Optimal Outcomes |
|---|---|---|
| In vivo neural recording | Signal-to-Noise Ratio (SNR), Local Field Potential (LFP) fidelity | Significantly enhanced SNR for low-frequency brain activity [17] |
| Cell-based Assays | Cell viability, Morphological response | High biocompatibility, unaffected cell growth and function [8] [4] |
| Electrochemical Stability | Impedance change during continuous operation | <10% variation over 72 hours of stimulation |
| Mechanical Integrity | Resistance change under strain | <5% change under 15% strain for flexible applications |
For organic mixed ion-electron conductors (OMIECs), which enable unique coupled dual charge transport, performance in devices like organic electrochemical transistors (OECTs) must be evaluated. Key metrics include transconductance, switching speed, and cycle stability [17]. These materials exhibit exceptional electrical, electrochemical, and device properties along with compatibility and conformability with biological surfaces.
Diagram 1: Performance evaluation framework for in vivo photopolymerized bioelectronics, linking material properties to application outcomes.
Experimental Protocols
Protocol: In Vivo Photopolymerization and Electrical Characterization
Purpose: To form conductive bioelectronic structures directly in biological tissues and evaluate their electrical performance and signal fidelity.
Materials:
- Light-sensitive monomer solution (e.g., water-soluble conducting polymer precursors)
- LED light source (blue, green, or red) with adjustable intensity (0.5-5.0 W/cm²)
- Photoinitiating system (e.g., dye-based PIS, Type I or II photoinitiators)
- Two/four-point probe station
- Electrochemical impedance spectrometer
- In vivo model (zebrafish, chicken embryo, or mouse)
- Signal generator and data acquisition system
Procedure:
- Solution Preparation: Prepare photopolymerizable solution containing monomers and photoinitiating system optimized for visible light activation [17] [63]. For biocompatible applications, use initiator-free, visible-light-induced polymerization of water-soluble conducting polymer precursors [17].
Administration: Introduce solution to target tissue via injection or topical application. For mouse skin models, apply solution directly to exposed tissue surface [17].
Photopolymerization:
DC Resistance Measurement:
- Using Unit UT502A Insulation Tester or equivalent
- Apply test voltage appropriate for material (typically 100-500 V)
- Measure resistance after 1 minute of electrification
- Calculate conductivity: σ = L/(R×A), where L is distance between electrodes, R is measured resistance, and A is cross-sectional area
AC Impedance Characterization:
- Using GW-Instek LCR-6300 LCR Meter or equivalent
- Apply small AC signal (10-100 mV) across frequency range (10 Hz-300 kHz)
- Record impedance magnitude and phase angle at each frequency
- Plot Bode and Nyquist plots for analysis
Signal Fidelity Assessment:
- Interface photopolymerized electrodes with neural tissue
- Record spontaneous or evoked neural activity
- Compare signal-to-noise ratio with traditional electrodes
- Analyze frequency content of recorded signals
Stability Testing:
- Monitor electrical parameters over time in physiological conditions
- Perform accelerated aging tests if applicable
- Assess mechanical-electrical coupling under strain
Troubleshooting:
- Incomplete polymerization: Increase light intensity or exposure time; optimize photoinitiator concentration
- High impedance: Adjust material composition to enhance conductivity; ensure proper formation of conductive pathways
- Poor signal fidelity: Check electrode-tissue interface; optimize material mechanical properties to match tissue
Protocol: Optimization of Photopolymerization Parameters
Purpose: To systematically determine optimal light intensity and exposure time for achieving desired electrical and mechanical properties.
Materials:
- Photopolymerizable resin
- Adjustable LED light source (365-455 nm)
- Rheometer with UV light attachment (e.g., Malvern Kinexus Ultra+)
- FTIR spectrometer for conversion monitoring
Procedure:
- Light Intensity Screening:
- Prepare resin samples with standardized photoinitiator concentration
- Expose to varying light intensities (0.5, 1.0, 2.0, 3.0, 4.0, 5.0 W/cm²) [8]
- Maintain exposure time constant initially
- Measure degree of conversion using FTIR
Kinetic Analysis:
- Using rheometer equipped with UV light source
- Monitor shear storage modulus (G′) during photopolymerization
- Determine crossover time (tₑ) when G′ diverges from shear loss modulus (G″)
- Calculate polymerization rate as slope of G′ versus time (dG′/dt) [8]
Exposure Time Optimization:
- Determine minimum polymerization time for each intensity
- Relate exposure parameters to final material properties
- Establish process window for consistent electrical performance
The Scientist's Toolkit
Table 3: Essential Research Reagent Solutions for In Vivo Photopolymerization
| Reagent/Category | Function | Examples/Specifications |
|---|---|---|
| Visible Light Photoinitiators | Generate active species under LED irradiation to initiate polymerization | Carbazole derivatives (C1-C4, A1-A4) [63]; Dye-based PIS with absorption at 405-455 nm |
| Conductive Monomers | Form electrically conductive polymer networks when polymerized | Water-soluble conducting polymer precursors; Epoxidized acrylated plant oil derivatives (EACO, EAMR) [62] |
| LED Light Sources | Provide specific wavelengths for controlled photopolymerization | Narrow emission bands (FWHM ~10 nm) at 365, 395, 405, or 455 nm [63] |
| Bioactive Additives | Enhance biocompatibility and tissue integration | Peptide motifs, Extracellular matrix components |
| Oxygen Barrier Systems | Mitigate oxygen inhibition during polymerization | Composite oxygen-rich films; PDMS membranes [64] |
| Electrical Characterization Instruments | Measure key performance parameters | LCR Meter (e.g., GW-Instek LCR-6300); Insulation Tester (e.g., Unit UT502A) [62] |
Workflow and Signaling Pathways
The complete experimental workflow for developing and evaluating photopolymerized bioelectronics involves multiple interconnected stages, from material preparation to performance validation.
Diagram 2: Complete experimental workflow for in vivo photopolymerized bioelectronics development, highlighting critical parameters at each stage.
The signaling pathway for successful bioelectronic integration begins with photopolymerization initiation and proceeds through several critical phases:
Photonic Activation: Light at specific wavelengths (365-455 nm) activates photoinitiators, generating reactive species (free radicals, cations) [63]
Polymer Network Formation: Reactive species initiate polymerization of monomers, creating a cross-linked hydrogel network with integrated conductive pathways
Bio-Tissue Interface Formation: The soft, hydrated polymer structure interdigitates with tissue components, establishing close contact that minimizes interfacial impedance
Signal Transduction: Electronic and ionic charges transfer across the tissue-electrode interface, enabling either recording of physiological signals or delivery of therapeutic stimulation
Long-Term Integration: The body's biological systems respond to the implanted material, with optimal interfaces minimizing foreign body response while maintaining stable electrical performance
Critical parameters influencing signaling fidelity include the charge transfer efficiency at the tissue-electrode interface, the mechanical compliance match between device and tissue, and the ionic-to-electronic coupling efficiency in the bulk material.
The protocols and characterization methods outlined herein provide a standardized framework for evaluating electrical performance and signal fidelity of in vivo photopolymerized bioelectronics. As this technology advances, key focus areas should include developing photoinitiating systems with enhanced tissue penetration capabilities, optimizing long-term stability under physiological conditions, and establishing comprehensive safety profiles for clinical translation. The unique ability to form customized conductive interfaces directly in living tissues positions in vivo photopolymerization as a foundational technology for next-generation bioelectronic medicines, neural interfaces, and chronic implantable devices.
The field of in vivo photopolymerization for bioelectronics represents a paradigm shift in therapeutic and diagnostic medical devices. This technology enables the minimally invasive implantation of sophisticated, tissue-conformal bioelectronic interfaces via injectable precursors that are cured directly within the body using light. Clinical translation of these innovative systems necessitates careful navigation of an evolving regulatory framework that must address unique challenges in manufacturing, quality control, and safety assessment [65]. Unlike traditional medical devices with static manufacturing specifications, photopolymerized in vivo bioelectronics introduce dynamic material properties, patient-specific geometries, and complex biological interactions that demand novel regulatory approaches. This Application Note provides a structured pathway for researchers to align their development processes with current and emerging regulatory expectations, focusing on practical methodologies to establish safety and efficacy profiles required for clinical approval.
Regulatory Framework Analysis
Current Regulatory Status and Gaps
The regulatory environment for 3D-printed and photopolymerized medical products is currently in a transitional phase. While the U.S. Food and Drug Administration (FDA) has approved specific products like Spritam (a 3D-printed epilepsy medication), no comprehensive, harmonized regulatory framework exists specifically for 3D-printed pharmaceutical products or in vivo photopolymerized devices [65]. The current regulatory practice often considers all products under similar standards, regardless of their manufacturing method or complexity, which frequently fails to evaluate the unique quality attributes of additively manufactured products [65].
Table 1: Current Regulatory Guidance for Innovative Medical Technologies
| Regulatory Body | Existing Guidance | Relevance to In Vivo Photopolymerization |
|---|---|---|
| U.S. FDA | Technical Considerations for Additive Manufactured Medical Devices (2017) | Provides foundation for manufacturing standards but lacks specific guidance for in vivo curing and bioelectronic functionality [65]. |
| European Medicines Agency (EMA) | Medical Device Regulation (MDR) (EU) 2017/745 | Offers risk-based approach for medical devices but has not authorized any 3D-printed pharmaceutical products [65]. |
| International Council for Harmonisation (ICH) | Q13 Continuous Manufacturing | Principles relevant for the continuous nature of photopolymerization processes [65]. |
| FDA Emerging Technology Program (ETP) | Facilitates approval of novel technologies | Pathway used for Spritam approval; suitable for complex products like photopolymerized bioelectronics [65]. |
Regulatory authorities have recognized that some critical quality attributes (CQAs) of 3D-printed products cannot be effectively assessed using current ICH Q6 guidelines, which focus on traditional attributes like content uniformity and dissolution but do not fully cover parameters essential for 3D-printed products, such as structural fidelity, layer adhesion strength, spatial distribution of active components, and layer resolution [65]. For in vivo photopolymerized bioelectronics, additional CQAs include polymerization kinetics, degradation profile, conductivity stability, and biocompatibility of leachable photoinitiators and monomers.
Quality by Design (QbD) Framework Implementation
A Quality by Design approach is essential for the development of in vivo photopolymerized bioelectronics [65]. The QbD methodology centers around four essential elements:
- Target Product Profile (TPP): Defines the desired performance characteristics of the final bioelectronic device, including conductivity range, mechanical properties, degradation timeline, and therapeutic outcomes.
- Critical Material Attributes (CMAs): For photopolymerizable bioinks, these include viscosity, photoreactive group density, initiator efficiency, conductivity, and biocompatibility components [65] [11].
- Critical Process Parameters (CPPs): In vivo photopolymerization parameters such as light wavelength, intensity, exposure duration, oxygen concentration, and temperature.
- Critical Quality Attributes (CQAs): Final product characteristics including mechanical strength, adhesion to tissue, conductivity, degradation rate, and absence of cytotoxic leachables.
The relationship between these elements forms the basis for a science- and risk-based framework that regulatory authorities increasingly expect for complex, innovative medical products [65].
Experimental Protocols for Regulatory Compliance
Protocol: Biocompatibility and Degradation Assessment
Purpose: To evaluate the in vivo biocompatibility and degradation profile of photopolymerized conductive hydrogels for bioelectronic applications.
Materials:
- PEDOT:AlgS conductive polymer (synthesized per Section 3.3)
- Gelatin-based bioadhesive hydrogel precursor
- Photoinitiator (LAP or Irgacure 2959)
- 365-405 nm light source (wavelength appropriate for initiator)
- Animal model (e.g., mouse or rat)
Methodology:
- Formulation Preparation: Combine PEDOT:AlgS with gelatin-based hydrogel precursor at 5-15% w/v concentration in PBS. Add photoinitiator at 0.05-0.2% w/v [11].
- In Vivo Implantation: Inject 100-200 μL of precursor formulation subcutaneously in the dorsal region of anesthetized animals.
- In Vivo Photopolymerization: Expose the injected area to visible light (400-450 nm) at 10-50 mW/cm² for 60-120 seconds to initiate cross-linking [17].
- Assessment Timeline:
- Acute (1-7 days): Monitor for inflammation, edema, and infection.
- Intermediate (1-4 weeks): Evaluate tissue integration, foreign body response, and initial degradation.
- Chronic (1-3 months): Assess complete degradation profile, tissue remodeling, and any long-term immunological responses.
- Endpoint Analysis:
- Histological examination of explanted tissue for fibrous capsule formation, cellular infiltration, and tissue architecture.
- Immunohistochemistry for macrophages (CD68) and T-cells (CD3) to quantify immune response.
- Measurement of remaining implant material mass to calculate degradation rate.
Regulatory Considerations: This protocol addresses ISO 10993-6 standards for biological evaluation of medical devices, specifically assessing local effects after implantation.
Protocol: Electrical Performance Stability Testing
Purpose: To validate the stability of electrical properties of photopolymerized conductive hydrogels under physiological conditions.
Materials:
- PEDOT:AlgS conductive hydrogel samples (5×5×1 mm)
- Phosphate-buffered saline (PBS), pH 7.4
- Impedance analyzer (e.g., Autolab PGSTAT)
- Environmental chamber (37°C)
Methodology:
- Sample Preparation: Photopolymerize standardized samples using 405 nm light at 20 mW/cm² for 60 seconds.
- Initial Characterization:
- Measure DC conductivity via 4-point probe method.
- Perform electrochemical impedance spectroscopy (1 Hz-1 MHz).
- Record UV-vis-NIR spectra to confirm doping state preservation [11].
- Accelerated Aging: Incubate samples in PBS at 37°C for predetermined intervals (1, 7, 14, 30 days).
- Periodic Assessment:
- Measure conductivity retention at each time point.
- Evaluate electrochemical performance via cyclic voltammetry.
- Assess mechanical integrity through compression testing.
- Data Analysis:
- Calculate degradation rate constant from conductivity decay profile.
- Determine correlation between electrical and mechanical property changes.
Regulatory Considerations: This testing provides essential data for performance claims in regulatory submissions and establishes device reliability throughout its functional lifespan.
Protocol: Synthesis of Water-Dispersible PEDOT:AlgS Conductive Polymers
Purpose: To synthesize inherently biocompatible, water-dispersible conductive polymers with enhanced dispersibility for injectable bioelectronics [11].
Materials:
- Sodium alginate (200 kDa)
- Chlorosulfonic acid (CSA)
- EDOT monomer
- Ammonium persulfate (oxidant)
- Dialysis membrane (MWCO 12-14 kDa)
- Freeze dryer
Methodology:
- Sulfonation of Alginate:
- Dissolve sodium alginate (2% w/v) in dimethylformamide.
- Add chlorosulfonic acid (1.5-2% w/v) dropwise with stirring at 0-4°C.
- React for 4 hours at room temperature.
- Precipitate in ice-cold ethanol and collect by centrifugation.
- Confirm sulfonation degree (~37%) by FTIR (peak at 1200 cm⁻¹) [11].
- Oxidative Polymerization:
- Dissolve sulfonated alginate (AlgS) in deionized water (1% w/v).
- Add EDOT monomer (0.9 mL per gram of AlgS).
- Initiate polymerization with ammonium persulfate (1:1 molar ratio to EDOT).
- Stir for 48 hours at room temperature.
- Purification:
- Dialyze against deionized water for 72 hours to remove unreacted monomers and oxidant.
- Freeze-dry to obtain PEDOT:AlgS powder.
- Characterization:
- Confirm polymer structure by UV-vis (absorption bands at 600-900 nm and 700-1200 nm indicating polaronic and bipolaronic states) [11].
- Measure aqueous dispersibility (5-fold improvement over PEDOT:PSS).
- Evaluate dry-state conductivity via 4-point probe.
Applications: The resulting PEDOT:AlgS demonstrates molecular-level and in vivo degradability, making it suitable for transient implantable biomonitoring devices [11].
Research Reagent Solutions
Table 2: Essential Materials for In Vivo Photopolymerization Research
| Reagent Category | Specific Examples | Function | Performance Considerations |
|---|---|---|---|
| Conductive Polymers | PEDOT:AlgS [11], PEDOT:PSS | Provide electronic and ionic conductivity | PEDOT:AlgS offers 5x improved dispersibility and 20x higher conductivity vs conventional methods [11] |
| Photopolymerizable Hydrogels | GelMA [66] [46], PEGDA [46], Alginate-based | Structural matrix for tissue integration | GelMA supports cell viability >90% when polymerized with 365 nm light at 5-10 mW/cm² [66] |
| Photoinitiators | LAP, Irgacure 2959 [66] | Generate free radicals upon light exposure | Cytotoxicity varies significantly; LAP demonstrates better biocompatibility at 0.1% w/v [66] |
| Crosslinkers | EGDMA, PEGDA | Enhance mechanical stability | Concentration (0.5-2% w/v) directly influences modulus (1-50 kPa) and mesh size [66] |
| Biocompatible Dopants | Sulfonated alginate (AlgS) [11] | Enhance hydrophilicity and dispersibility | 37% conversion of hydroxyl groups optimal for doping efficiency [11] |
| Light Sources | 365-405 nm LED arrays [17] | Initiate photopolymerization | Visible light (400-450 nm) penetrates tissue better than UV with less damage [17] |
Workflow Visualization
Figure 1: Integrated Development Workflow for Photopolymerized Bioelectronics
Figure 2: QbD Framework for Regulatory Compliance
The clinical translation of in vivo photopolymerized bioelectronics requires a proactive approach to regulatory science that addresses the unique characteristics of these dynamic systems. As regulatory frameworks evolve to accommodate additive manufacturing technologies, researchers should implement Quality by Design principles from the earliest development stages, with particular attention to critical material attributes and process parameters that influence the safety and efficacy of the final bioelectronic device. The experimental protocols and reagent solutions outlined in this Application Note provide a foundation for generating the comprehensive data required for regulatory submissions. Future directions will include the development of standardized testing methods specific to photopolymerized medical devices, harmonization of international regulatory standards, and establishment of performance benchmarks for bioelectronic functionality in physiological environments. Through rigorous scientific evaluation and collaborative engagement with regulatory authorities, the field can accelerate the translation of these transformative technologies from laboratory innovation to clinical implementation.
Conclusion
In vivo photopolymerization represents a paradigm shift in bioelectronics, moving from rigid, pre-formed implants to soft, customized interfaces created directly within the body. This synthesis of the foundational principles, methodologies, and validation efforts demonstrates a clear path toward mitigating the core challenges of traditional bioelectronics, such as inflammation, scarring, and mechanical mismatch. The key takeaway is the ability to form detailed, layered conductive patterns with unprecedented biocompatibility and minimal invasiveness. Future progress hinges on the development of advanced photopolymer materials with enhanced optical and electrical properties, hardware improvements for higher resolution, and rigorous quality assurance for clinical applications. The convergence of this technology with personalized medicine and advanced drug delivery systems holds immense potential to transform the treatment of neurological disorders and open new frontiers in regenerative medicine and human-machine interfaces.
References
- 1. Achieving Detailed Conducting Patterns for Bioelectronics [https://pubmed.ncbi.nlm.nih.gov/39509564/]
- 2. Origami by frontal photopolymerization - PMC - PubMed Central [https://pmc.ncbi.nlm.nih.gov/articles/PMC5409495/]
- 3. Real-time molecular-level visualization of mass flow during ... [https://www.nature.com/articles/s41427-021-00292-1]
- 4. Using light to create bioelectronics inside the body [https://www.lunduniversity.lu.se/article/using-light-create-bioelectronics-inside-body]
- 5. Solution-processable and photo-curable system for low-cost ... [https://pmc.ncbi.nlm.nih.gov/articles/PMC12528392/]
- 6. Poly(3-hexylthiophene) nanoparticles as visible-light ... [https://pubs.rsc.org/en/content/articlehtml/2025/mh/d4mh01802h]
- 7. The Influence of the Photoinitiating System on Residual ... [https://www.mdpi.com/2079-6412/15/10/1125]
- 8. Photopolymerization Parameters Influence Mechanical ... [https://pmc.ncbi.nlm.nih.gov/articles/PMC10170473/]
- 9. Solution-processable and photo-curable system for low ... [https://www.nature.com/articles/s41467-025-64256-7]
- 10. Achieving Detailed Conducting Patterns for Bioelectronics [https://pmc.ncbi.nlm.nih.gov/articles/PMC11672244/]
- 11. Boosting hydrogel conductivity via water-dispersible ... [https://www.nature.com/articles/s41467-025-59045-1]
- 12. PEDOT:PSS-based bioelectronics for brain monitoring and ... [https://www.nature.com/articles/s41378-025-00948-w]
- 13. Photolithographic Fabrication of a Micro-electrode Surface ... [https://www.jstage.jst.go.jp/article/isijinternational/61/4/61_ISIJINT-2020-316/_html/-char/en]
- 14. Reliability and stability of Bioelectronic Medicine: a critical and ... [https://bioelecmed.biomedcentral.com/articles/10.1186/s42234-025-00179-4]
- 15. Cleanroom‐Free Toolkit for Patterning Submicron ... [https://pmc.ncbi.nlm.nih.gov/articles/PMC11983252/]
- 16. Advances in lithographic techniques for precision ... [https://pmc.ncbi.nlm.nih.gov/articles/PMC10713959/]
- 17. Visible-Light-Driven Aqueous Polymerization Enables in ... [https://pubmed.ncbi.nlm.nih.gov/41211808/]
- 18. Advances in vat photopolymerization - RSC Publishing [https://pubs.rsc.org/en/content/articlehtml/2025/lp/d5lp00010f]
- 19. Vat photo-polymerization 3D printing of gradient scaffolds ... [https://pubmed.ncbi.nlm.nih.gov/40414264/]
- 20. Enhancement of in vitro and in vivo bone repair ... [https://www.nature.com/articles/s41598-025-99101-w]
- 21. Next generation bioelectronic medicine: making the case for ... [https://pmc.ncbi.nlm.nih.gov/articles/PMC11748337/]
- 22. Application of biomimetic approaches in the treatment of ... [https://pmc.ncbi.nlm.nih.gov/articles/PMC12538068/]
- 23. Three-Dimensional Printing and Its Impact on the ... [https://www.mdpi.com/2673-4125/5/2/13]
- 24. The rise of 3D bioprinting advancements in modeling ... [https://pmc.ncbi.nlm.nih.gov/articles/PMC12177659/]
- 25. The rise of bioelectronic medicine - BioMed Central [https://bioelecmed.biomedcentral.com/articles/10.1186/s42234-024-00151-8]
- 26. Biosensor-Integrated Drug Delivery Systems as New ... [https://pmc.ncbi.nlm.nih.gov/articles/PMC9496590/]
- 27. Photopolymerization [https://bio-protocol.org/exchange/minidetail?id=3957555&type=30]
- 28. A system for bioelectronic delivery of treatment directed ... [https://www.nature.com/articles/s41598-023-41572-w]
- 29. A Review on Modeling Cure Kinetics and Mechanisms of ... [https://pmc.ncbi.nlm.nih.gov/articles/PMC9145830/]
- 30. Photopolymerization - an overview | ScienceDirect Topics [https://www.sciencedirect.com/topics/materials-science/photopolymerization]
- 31. Optimize projected mask images for improving three- ... [https://www.sciencedirect.com/science/article/abs/pii/S2214860424003038]
- 32. Recent Progress of Soft and Bioactive Materials in Flexible ... [https://pmc.ncbi.nlm.nih.gov/articles/PMC12038164/]
- 33. Latest Advances in Highly Efficient Dye-Based Photoinitiating ... [https://pmc.ncbi.nlm.nih.gov/articles/PMC10007623/]
- 34. Photoinitiators for Medical Applications—The Latest ... [https://www.mdpi.com/1420-3049/29/16/3898]
- 35. Photoinitiator Selection and Concentration in ... [https://www.mdpi.com/2073-4360/14/13/2708]
- 36. Recent Progress of Biomaterial-Based Hydrogels for ... [https://www.mdpi.com/2310-2861/11/6/442]
- 37. Printable Conductive Hydrogels and Elastomers for ... [https://pmc.ncbi.nlm.nih.gov/articles/PMC12469759/]
- 38. : Achieving Detailed Conducting Patterns... In Vivo Photopolymerization [https://portal.research.lu.se/en/publications/in-vivo-photopolymerization-achieving-detailed-conducting-pattern]
- 39. Rare-earth doped upconversion- photopolymerization hydrogel... [https://pubs.rsc.org/en/content/articlelanding/2025/tc/d4tc04309j]
- 40. Kinetics analysis of radical photopolymerizations for UV ... [https://www.sciencedirect.com/science/article/abs/pii/S0141813024095114]
- 41. Spatially resolved photopolymerization kinetics and ... [https://pubmed.ncbi.nlm.nih.gov/15576155/]
- 42. A Review on Modeling Cure Kinetics and Mechanisms of ... [https://www.mdpi.com/2073-4360/14/10/2074]
- 43. Irradiance Measurement of High-Power UV Light Sources [https://www.gigahertz-optik.com/en-us/app-groups/uv-radiation/irradiance-measurement-of-high-power-uv-light-sources-uv-curing/]
- 44. A Guide to Optimising UV LED Curing Efficiency [https://www.aegina-pure.com/uv-led-curing-efficiency/]
- 45. Research: Designing Custom Solutions with UV LEDs [https://ies.org/lda/research-designing-custom-solutions-with-uv-leds/]
- 46. Vat Photopolymerization of Smart Polymers for Biomedical ... [https://pmc.ncbi.nlm.nih.gov/articles/PMC12481486/]
- 47. Strategic advances in Vat Photopolymerization for 3D ... [https://www.sciencedirect.com/science/article/pii/S2452199X25001872]
- 48. UC Irvine Researchers Invent a Bioelectronic-integrated ... [https://engineering.uci.edu/news/2025/10/uc-irvine-researchers-invent-bioelectronic-integrated-artificial-colon-disease-studies]
- 49. Materials strategy and device fabrication for stable closed ... [https://www.nature.com/articles/s44328-025-00045-y]
- 50. Abstracts from the Sixth Bioelectronic Medicine Summit [https://pmc.ncbi.nlm.nih.gov/articles/PMC12538809/]
- 51. Automation for Photopolymer Optimization: Developments ... [https://uvebtech.com/articles/2025/automation-for-photopolymer-optimization-developments-toward-next-generation-energy-materials/]
- 52. Zebrafish as an animal model for biomedical research [https://www.nature.com/articles/s12276-021-00571-5]
- 53. Embryonic Zebrafish as a Model for Investigating the ... [https://www.mdpi.com/2227-9059/12/7/1559]
- 54. Predicting zebrafish (Danio rerio) embryo developmental ... [https://www.sciencedirect.com/science/article/abs/pii/S0048969721038924]
- 55. Zebrafish Models: A Game Changer in Drug Discovery [https://www.zeclinics.com/blog/zebrafish-models-a-game-changer-in-drug-discovery]
- 56. Validation, Optimization, and Application of the Zebrafish ... [https://pmc.ncbi.nlm.nih.gov/articles/PMC8476914/]
- 57. Toxicity of stereolithography 3D printed objects at the ... [https://www.sciencedirect.com/science/article/abs/pii/S221486042500079X]
- 58. Zebrafish: A Useful Animal Model for the Characterization of ... [https://pmc.ncbi.nlm.nih.gov/articles/PMC9496256/]
- 59. Advances in bioelectronics for neural interfacing [https://link.springer.com/article/10.1557/s43579-025-00822-w]
- 60. Implantable bioelectronics for gut electrophysiology [https://www.nature.com/articles/s41467-025-65473-w]
- 61. Enzyme-mediated controlled polymerization and its ... [https://www.sciencedirect.com/science/article/abs/pii/S0026265X24026948]
- 62. Synthesis, photopolymerization and evaluation of electrical ... [https://link.springer.com/article/10.1007/s00289-024-05349-z]
- 63. High- Performance Photoinitiating Systems for LED-Induced... [https://pmc.ncbi.nlm.nih.gov/articles/PMC9860695/]
- 64. Electrically assisted continuous vat photopolymerization ... [https://www.sciencedirect.com/science/article/pii/S1359836822008228]
- 65. Toward a harmonized regulatory framework for 3D-printed ... [https://pmc.ncbi.nlm.nih.gov/articles/PMC12619793/]
- 66. Photopolymerizable Biomaterials and Light-Based 3D Printing ... [https://pmc.ncbi.nlm.nih.gov/articles/PMC7572843/]